javascript


Table of contents
- emmet
- Inline JavaScript , Internal JavaScript ,External JavaScript
- JavaScript Statements
- Const, Let, Var
- String Concatenation
- Implicit Type Conversion
- Data Types
- Arrays
- Functions
- setTimeout()
- Objects
- strings
- foreach
- map method
- Filter
- reduce
- if else
- switch case
- for,for of , for in
- This keyword
- Hoisting
- closures
- Destructuring
- rest operator
- spread operator
- JSON
- Fetch API
- Callback Hell
- Asynchronous js
- promises
- Async/Await
- Ajax
Variables and Data Types
Operators
Control Flow (if-else, switch, loops)
Functions
Arrays
Objects
Strings
Numbers
Booleans
Null and Undefined
Type Conversion
Scope (Global scope, Function scope, Block scope)
Hoisting
Closures
this keyword
Prototype and Prototypal Inheritance
Strict Mode
Destructuring
Template Literals
Rest and Spread Operators
Default Parameters
Array Methods (forEach, map, filter, reduce, etc.)
Promises
Async/Await
Fetch API
Classes and Object-oriented Programming
Modules (ES Modules)
Error Handling (try-catch, throw)
Regular Expressions
JSON
Event Handling
DOM Manipulation
AJAX
Local Storage and Session Storage
Web APIs (DOM API, CSSOM, etc.)
Callbacks
Arrow Functions
Map and Set
Symbol
Optional Chaining (?.)
Nullish Coalescing Operator (??)
BigInt
Promise.allSettled()
Optional Catch Binding
Dynamic Import
Array Flat and FlatMap Methods
Object.fromEntries()
String.trimStart() and String.trimEnd()
Array.at()
Intl API (Internationalization API)
Object.getOwnPropertyDescriptors()
GlobalThis
Temporal API
Logical Assignment Operators (&&=, ||=, ??=)
emmet
Emmet is a powerful toolkit and abbreviation engine primarily used in web development for rapidly generating HTML and CSS code. It provides a shorthand syntax that allows developers to write code snippets using abbreviations, which are then expanded into full-fledged code blocks.
Emmet was originally developed as a plugin for the Sublime Text editor but has gained popularity and support across various code editors and IDEs, including Visual Studio Code, Atom, IntelliJ IDEA, and more. It offers a quick and efficient way to write code, saving developers time and effort.
Emmet enables developers to write complex HTML and CSS structures using concise and intuitive abbreviations. It supports a wide range of features, including:
HTML Abbreviations: Emmet provides abbreviations for HTML tags, such as
div,ul,p, etc. These tags can be combined and nested using operators like>,+,^, and*to create complex structures quickly.CSS-like Selectors: Emmet allows you to use CSS-like selectors to specify attributes, classes, IDs, and other properties of HTML elements. For example,
div.container#mainrepresents a<div>element with a class of "container" and an ID of "main".Numeric Multiplication: You can use numeric multiplication to generate multiple elements with incremental attributes or content. For example,
ul>li.item$*5expands into five<li>elements with the class "item" and numbers appended to it (item1, item2, item3, etc.).CSS Abbreviations: Emmet also provides shortcuts for CSS properties, allowing you to write CSS rules more quickly. For instance,
m10expands tomargin: 10px;, andp10-20expands topadding: 10px 20px;.Customization: Emmet can be customized to fit individual preferences and coding conventions. Developers can configure their own custom snippets, abbreviations, and preferences to enhance their workflow.
Emmet is particularly useful when working on large-scale web projects that involve complex HTML and CSS structures. It greatly accelerates the development process and improves productivity by reducing the amount of manual typing required.
It's worth noting that while Emmet is widely used and highly regarded in the web development community, it is an optional tool, and developers can choose to use it or not based on their personal preference and workflow.
Inline JavaScript , Internal JavaScript ,External JavaScript
Inline JavaScript, Internal JavaScript, and External JavaScript are different ways to include JavaScript code within an HTML document.
Inline JavaScript: In inline JavaScript, JavaScript code is directly embedded within an HTML element using the
onevent attributes or thescripttag with thesrcattribute. Here are examples of both approaches:a. Using
onevent attributes:<button onclick="myFunction()">Click me</button>In this example, the
onclickevent attribute contains the JavaScript codemyFunction(), which will be executed when the button is clicked.b. Using the
scripttag with code directly in the HTML:<script> function myFunction() { alert("Hello, world!"); } </script>In this example, the JavaScript code is enclosed within the
<script>tags directly in the HTML document.Inline JavaScript is convenient for simple tasks or quick code snippets but can become difficult to manage and maintain in larger projects.
Internal JavaScript: Internal JavaScript refers to JavaScript code placed within the
<script>tags within the HTML document. The<script>tags are usually placed in the<head>or<body>section of the HTML document. Here's an example:<html> <head> <script> function myFunction() { alert("Hello, world!"); } </script> </head> <body> <!-- HTML content --> <button onclick="myFunction()">Click me</button> </body> </html>The JavaScript code is placed between the
<script>tags within the HTML document itself. This approach allows you to keep the JavaScript code separate from the HTML content, but it can still result in code duplication and is not ideal for larger projects.External JavaScript: External JavaScript involves storing the JavaScript code in a separate external file with a
.jsextension and linking it to the HTML document using thesrcattribute of the<script>tag. Here's an example:<html> <head> <script src="script.js"></script> </head> <body> <!-- HTML content --> <button onclick="myFunction()">Click me</button> </body> </html>In this example, the JavaScript code is stored in a file called
script.js, and it is linked to the HTML document using thesrcattribute of the<script>tag.Using external JavaScript files allows for better code organization, reusability, and separation of concerns. It makes it easier to manage and maintain JavaScript code in larger projects and enables caching and faster loading of the JavaScript code.
In general, it is considered a best practice to use external JavaScript files for larger projects, while inline and internal JavaScript can be used for smaller tasks or quick prototyping.
JavaScript Statements
https://www.w3schools.com/js/js_statements.asp
Const, Let, Var
const, let, and var are three different ways to declare variables in JavaScript. Each keyword has its own scoping rules and behaviors.
const: Variables declared withconstare block-scoped and have a constant value. Once assigned, the value of aconstvariable cannot be changed. It is commonly used for values that are not intended to be reassigned.const x = 5; // x = 10; // Error: Assignment to constant variable const array = [1, 2, 3]; array.push(4); // Valid: The array itself can be mutatedconstis often used for declaring variables that should not be re-assigned throughout the code.let: Variables declared withletare block-scoped but can have their values reassigned. The scope of aletvariable is limited to the block in which it is defined.let x = 5; x = 10; // Valid: The value of 'x' can be changed let y = 20; if (true) { let y = 30; // This 'y' is scoped to the if block console.log(y); // Output: 30 } console.log(y); // Output: 20 (outer 'y' is unchanged)letis commonly used when you need to reassign a variable or when you want to limit its scope to a specific block.var: Variables declared withvarare function-scoped or globally scoped, but not block-scoped. They can be reassigned and have some different scoping behaviors compared toletandconst.var x = 5; x = 10; // Valid: The value of 'x' can be changed function example() { var y = 20; if (true) { var y = 30; // This 'y' reassigns the outer 'y' console.log(y); // Output: 30 } console.log(y); // Output: 30 (outer 'y' is changed) } example();Unlike
letandconst,varvariables are not block-scoped. They are function-scoped, meaning they are accessible throughout the entire function in which they are defined. This can lead to potential issues with variable hoisting and unintended global scope.
In modern JavaScript, it is generally recommended to use const and let over var due to their block scoping and more predictable behavior. const should be used for values that should not be reassigned, while let can be used for variables that require reassignment.
String Concatenation
String concatenation in JavaScript refers to the process of combining multiple strings into a single string. There are multiple ways to perform string concatenation in JavaScript:
Using the
+operator: The+operator can be used to concatenate strings. When one of the operands is a string, JavaScript automatically converts the other operand to a string and concatenates them.const str1 = "Hello"; const str2 = "world"; const result = str1 + " " + str2; // Concatenates "Hello" and "world" console.log(result); // Output: "Hello world"Using the
concat()method: Theconcat()method is available on string objects and can be used to concatenate strings together.const str1 = "Hello"; const str2 = "world"; const result = str1.concat(" ", str2); // Concatenates "Hello" and "world" console.log(result); // Output: "Hello world"Using template literals (backticks): Template literals are a modern feature introduced in ECMAScript 2015 (ES6). They allow for more flexible string interpolation and multiline strings. Variables and expressions can be directly embedded within the string using
${}.const str1 = "Hello"; const str2 = "world"; const result = `${str1} ${str2}`; // Concatenates "Hello" and "world" console.log(result); // Output: "Hello world"
String concatenation is commonly used when combining static text with dynamic data or when constructing more complex strings. It's important to note that string concatenation can be resource-intensive when performed repeatedly in a loop, as strings in JavaScript are immutable and each concatenation operation creates a new string. In such cases, it may be more efficient to use an array and join() method or to leverage template literals for complex string construction.
Implicit Type Conversion
Implicit type conversion, also known as type coercion, is a feature in JavaScript where the JavaScript engine automatically converts one data type to another during certain operations or comparisons. It occurs when you perform operations involving values of different types.
JavaScript performs implicit type conversion based on a set of predefined rules to determine the appropriate conversion. Here are some examples of implicit type conversions in JavaScript:
String to Number Conversion: JavaScript converts a string to a number when performing mathematical operations:
 const str = "42";
 const num = str * 1; // Converts the string to a number
 console.log(num); // Output: 42
Number to String Conversion: JavaScript converts a number to a string when using the
+operator with a string:javascriptCopy codeconst num = 42; const str = "The answer is " + num; // Converts the number to a string console.log(str); // Output: "The answer is 42"Boolean to Number Conversion: JavaScript converts a boolean value (
trueorfalse) to a number:const bool = true; const num = bool * 1; // Converts the boolean to a number console.log(num); // Output: 1String to Boolean Conversion: JavaScript converts a non-empty string to
trueand an empty string tofalse:const str1 = "Hello"; const bool1 = !!str1; // Converts the string to a boolean console.log(bool1); // Output: true const str2 = ""; const bool2 = !!str2; // Converts the string to a boolean console.log(bool2); // Output: falseComparison and Equality Operators: JavaScript performs implicit type conversion when comparing values using comparison operators (
<,>,<=,>=) or equality operators (==,!=). It attempts to convert the values to a common type before making the comparison.const num = 42; const str = "42"; console.log(num == str); // Output: true (Implicit type conversion occurs)In this example, JavaScript converts the string
"42"to the number42before performing the equality comparison.
Implicit type conversion can be convenient in some cases, but it can also lead to unexpected behavior and bugs if not handled carefully. It is generally recommended to use explicit type conversion (using functions like parseInt, parseFloat, String, etc.) when working with different data types to ensure predictable results and avoid unintended conversions.
Data Types
JavaScript has several built-in data types that are used to represent different kinds of values. The main data types in JavaScript are as follows:
Primitive Data Types:
Number: Represents numeric values, such as integers and floating-point numbers.String: Represents textual data enclosed in single quotes ('') or double quotes ("").Boolean: Represents eithertrueorfalse.Null: Represents the absence of any object value.Undefined: Represents a variable that has been declared but has not been assigned a value.Symbol(added in ES6): Represents a unique identifier.
Complex Data Types:
Object: Represents a collection of key-value pairs, where the keys are strings and the values can be of any type, including other objects.Array: Represents an ordered list of values, which can be of any type, and are accessed by their indices (0-based).
Function Data Type:
Function: Represents a reusable block of code that performs a specific task when invoked.
const str = "Hello";
console.log(typeof str); // Output: "string"

const num = 42;
console.log(typeof num); // Output: "number"

const bool = true;
console.log(typeof bool); // Output: "boolean"

const obj = {};
console.log(typeof obj); // Output: "object"

const arr = [];
console.log(typeof arr); // Output: "object"

const func = function() {};
console.log(typeof func); // Output: "function"
Arrays
Arrays are a fundamental data structure in JavaScript that allow you to store and manipulate multiple values in a single variable. In JavaScript, arrays are dynamic and can hold values of different data types, such as numbers, strings, objects, and even other arrays.
Here's how you can create and work with arrays in JavaScript:
Creating an Array: You can create an array using square brackets
[]and separating the values with commas:const numbers = [1, 2, 3, 4, 5]; const fruits = ["apple", "banana", "orange"]; const mixed = [1, "hello", true, { name: "John" }]; const emptyArray = [];Accessing Array Elements: You can access individual elements in an array using zero-based indexing:
 const numbers = [1, 2, 3, 4, 5];
 console.log(numbers[0]); // Output: 1
 console.log(numbers[2]); // Output: 3
Modifying Array Elements: You can modify array elements by assigning new values to specific indices:
 const fruits = ["apple", "banana", "orange"];
 fruits[1] = "grape";
 console.log(fruits); // Output: ["apple", "grape", "orange"]
Array Length: You can determine the length of an array using the
lengthproperty:const numbers = [1, 2, 3, 4, 5]; console.log(numbers.length); // Output: 5Array Methods: JavaScript provides several built-in methods for working with arrays. Some common methods include:
push(): Adds one or more elements to the end of an array.pop(): Removes the last element from an array.shift(): Removes the first element from an array.unshift(): Adds one or more elements to the beginning of an array.splice(): Adds or removes elements at a specific position in an array.concat(): Concatenates two or more arrays.slice(): Extracts a portion of an array into a new array.indexOf(): Returns the first index at which a given element is found in an array.
    const numbers = [1, 2, 3];
    numbers.push(4); // Adds 4 to the end of the array
    numbers.pop(); // Removes the last element (4) from the array

    const fruits = ["apple", "banana"];
    fruits.unshift("orange"); // Adds "orange" to the beginning of the array
    fruits.shift(); // Removes the first element ("orange") from the array

    const animals = ["cat", "dog", "elephant"];
    animals.splice(1, 1, "lion"); // Removes "dog" and inserts "lion" at index 1

    const combined = numbers.concat(fruits); // Combines two arrays

    console.log(numbers); // Output: [1, 2, 3]
    console.log(fruits); // Output: ["banana"]
    console.log(combined); // Output: [1, 2, 3, "banana"]
Arrays in JavaScript provide powerful functionality for storing and manipulating collections of data. They are extensively used in JavaScript programming for tasks ranging from simple list processing to more complex data structures and algorithms.
Functions
Functions in JavaScript are reusable blocks of code that can be defined once and called multiple times to perform specific tasks or calculations. Functions provide a way to organize and modularize code, improving code reusability, readability, and maintainability.
Here's how you can define and use functions in JavaScript:
Function Declaration: You can declare a function using the
functionkeyword, followed by the function name, a list of parameters (optional), and the function body enclosed in curly braces{}:function greet(name) { console.log("Hello, " + name + "!"); }Function Expression: You can also define a function using a function expression, where the function is assigned to a variable:
 const greet = function(name) {
   console.log("Hello, " + name + "!");
 };
Arrow Function: Arrow functions provide a shorter syntax for defining functions. They are commonly used for anonymous functions or when you want to maintain the lexical scope of
this:const greet = (name) => { console.log("Hello, " + name + "!"); };Function Invocation: Once you have defined a function, you can invoke/call it by using the function name followed by parentheses
(), passing any required arguments:greet("Alice"); // Output: Hello, Alice!Return Statement: Functions can return values using the
returnstatement. Thereturnstatement terminates the function and sends a value back to the caller:function add(a, b) { return a + b; } const result = add(2, 3); console.log(result); // Output: 5Function Parameters and Arguments: Functions can accept parameters, which act as placeholders for values that are passed when invoking the function:
 function multiply(a, b) {
   return a * b;
 }

 const result = multiply(4, 5);
 console.log(result); // Output: 20
In this example,
aandbare the parameters of themultiplyfunction, and4and5are the arguments passed when invoking the function.
Functions in JavaScript can also have default parameters, rest parameters, and access variables defined in outer scopes. They can be assigned to variables, passed as arguments to other functions, and even returned from other functions.
Using functions, you can organize your code into modular and reusable blocks, encapsulating specific functionality. They are a crucial part of JavaScript programming and enable the creation of complex applications and systems.
setTimeout()
setTimeout is a JavaScript function that allows you to execute a function or a piece of code after a specified amount of time (in milliseconds). It is often used to delay the execution of code or to schedule an action to occur after a certain time has passed.
Basic Syntax
setTimeout(function, delayInMilliseconds);
Example
Here’s a simple example of how setTimeout works:
function sayHello() {
  console.log("Hello, world!");
}

// Execute `sayHello` after 2 seconds (2000 milliseconds)
setTimeout(sayHello, 2000);
In this example, the sayHello function will be executed after a 2-second delay.
Example with Anonymous Function
You can also pass an anonymous function directly into setTimeout:
setTimeout(function() {
  console.log("This message will appear after 3 seconds.");
}, 3000);
Clearing a Timeout
If you want to cancel the execution of a function scheduled with setTimeout, you can use the clearTimeout function:
let timeoutId = setTimeout(function() {
  console.log("This will not be logged.");
}, 5000);

// Cancel the timeout before it executes
clearTimeout(timeoutId);
In this example, the clearTimeout function prevents the scheduled function from running.
Objects
Objects in JavaScript are complex data types that allow you to store and organize related data and functionality together. They are collections of key-value pairs, where each key is a string (or a symbol) and each value can be of any data type, including other objects.
Here's how you can create and work with objects in JavaScript:
Object Literal Syntax: The simplest way to create an object is by using object literal syntax, which involves enclosing key-value pairs in curly braces
{}:const person = { name: "John", age: 30, occupation: "Developer" };In this example,
personis an object with three properties:name,age, andoccupation. Each property has a corresponding value.Accessing Object Properties: You can access object properties using dot notation (
object.property) or bracket notation (object["property"]):console.log(person.name); // Output: "John" console.log(person["age"]); // Output: 30Modifying Object Properties: You can modify object properties by assigning new values to them:
 person.age = 32;
 person["occupation"] = "Senior Developer";
Adding and Removing Object Properties: You can add new properties to an object by assigning a value to a new key:
person.location = "New York";To remove a property from an object, you can use the
deleteoperator:delete person.location;Nested Objects: Objects can contain other objects as property values, allowing you to create nested structures:
 const person = {
   name: "John",
   age: 30,
   occupation: "Developer",
   address: {
     street: "123 Main St",
     city: "New York"
   }
 };

 console.log(person.address.street); // Output: "123 Main St"
Object Methods: In addition to properties, objects can also have methods, which are functions defined as object properties:
 const person = {
   name: "John",
   sayHello: function() {
     console.log("Hello, " + this.name + "!");
   }
 };

 person.sayHello(); // Output: "Hello, John!"
In this example,
sayHellois a method that can be invoked on thepersonobject.
Objects in JavaScript are flexible and powerful data structures. They are widely used for organizing and representing complex data, modeling real-world entities, and building applications. Understanding objects and their properties and methods is essential for effective JavaScript programming.
strings
strings, string methods
https://www.w3schools.com/js/js_strings.asp
foreach
forEach() is a method available on arrays in JavaScript that allows you to iterate over each element in the array and execute a provided callback function for each element. It provides a convenient way to perform an action on each item in the array without explicitly using a traditional for loop.
The basic syntax of the forEach() method is as follows:
array.forEach(callbackFunction(currentValue, index, array) {
  // Code to execute on each element
});
array: The array on which theforEach()method is called.callbackFunction: The function to be executed on each element of the array. It is a user-defined function that takes three arguments:currentValue: The current element being processed in the array.index(optional): The index of the current element being processed.array(optional): The array on which theforEach()method was called.
The forEach() method does not return a new array; it simply iterates through the array elements and executes the callback function for each element.
Here's an example of using forEach() to log each element in an array:
const fruits = ['apple', 'banana', 'orange'];

fruits.forEach((fruit, index) => {
  console.log(`Element at index ${index}: ${fruit}`);
});
Output:
Element at index 0: apple
Element at index 1: banana
Element at index 2: orange
In this example, the forEach() method iterates over the fruits array and logs each element along with its index to the console.
Note that unlike other array methods like map() or filter(), forEach() does not create a new array based on the return value of the callback function. If you want to transform or filter elements and create a new array, consider using map() or filter() instead. However, if you simply need to perform an action on each element without creating a new array, forEach() is a useful choice.
map method
The map() method is a built-in array method in JavaScript that allows you to iterate over each element of an array and create a new array with the results of applying a provided callback function to each element. It is commonly used when you want to transform the elements of an array and create a new array based on the return values of the callback function.
The basic syntax of the map() method is as follows:
const newArray = array.map(callbackFunction(currentValue, index, array) {
  // Code to transform each element and return the new value
});
array: The array on which themap()method is called.callbackFunction: The function to be executed on each element of the array. It is a user-defined function that takes three arguments:currentValue: The current element being processed in the array.index(optional): The index of the current element being processed.array(optional): The array on which themap()method was called.
The map() method returns a new array containing the values returned by the callback function for each element of the original array, in the same order.
Here's an example of using map() to double each element in an array:
const numbers = [1, 2, 3, 4, 5];

const doubledNumbers = numbers.map((number) => {
  return number * 2;
});

console.log(doubledNumbers); // Output: [2, 4, 6, 8, 10]
In this example, the map() method iterates over the numbers array, and for each element, it multiplies the number by 2 and returns the new value. The doubledNumbers array contains the new transformed values.
One of the advantages of using map() is that it creates a new array without modifying the original array, which makes it non-destructive. Additionally, the resulting array has the same length as the original array, and it preserves the order of elements.
map() is commonly used to transform data, such as converting objects into a specific property value or formatting data for display. It provides a concise and expressive way to transform arrays and is a powerful tool for working with data in JavaScript.
Filter
The filter() method is a built-in array method in JavaScript that allows you to iterate over each element of an array and create a new array containing elements that satisfy a given condition. It is commonly used when you want to filter out specific elements from an array based on a certain criterion.
The basic syntax of the filter() method is as follows:
const newArray = array.filter(callbackFunction(currentValue, index, array) {
  // Code to test each element and return true or false
});
array: The array on which thefilter()method is called.callbackFunction: The function to be executed on each element of the array. It is a user-defined function that takes three arguments:currentValue: The current element being processed in the array.index(optional): The index of the current element being processed.array(optional): The array on which thefilter()method was called.
The filter() method returns a new array containing all the elements from the original array for which the callback function returns true. Elements for which the callback function returns false will not be included in the new array.
Here's an example of using filter() to get all even numbers from an array:
const numbers = [1, 2, 3, 4, 5, 6, 7, 8, 9, 10];

const evenNumbers = numbers.filter((number) => {
  return number % 2 === 0;
});

console.log(evenNumbers); // Output: [2, 4, 6, 8, 10]
In this example, the filter() method iterates over the numbers array, and for each element, it checks if the number is even (divisible by 2). If the number satisfies the condition (number % 2 === 0), it is included in the evenNumbers array. Otherwise, it is excluded from the new array.
Like map(), filter() also creates a new array without modifying the original array, making it non-destructive. The resulting array may have a different length from the original array, depending on how many elements satisfy the filtering condition.
The filter() method is useful for creating subsets of data based on specific criteria. It provides an elegant and concise way to extract elements from an array that meet certain conditions, making it a powerful tool for data manipulation and filtering in JavaScript.
reduce
The reduce() method is a built-in array method in JavaScript that allows you to iterate over the elements of an array and accumulate them into a single value. It is commonly used when you want to perform a calculation or transformation on an array to derive a single result. The reduce() method executes a provided callback function for each element in the array, passing an accumulator as well as the current element, and returns a final value.
The basic syntax of the reduce() method is as follows:
const result = array.reduce(callbackFunction(accumulator, currentValue, index, array) {
  // Code to accumulate the elements and return the updated accumulator
}, initialValue);
array: The array on which thereduce()method is called.callbackFunction: The function to be executed on each element of the array. It is a user-defined function that takes four arguments:accumulator: The accumulator accumulates the callback's return values. It is the result of previous iterations and is initialized with theinitialValue(if provided) or the first element of the array (if noinitialValueis given).currentValue: The current element being processed in the array.index(optional): The index of the current element being processed.array(optional): The array on which thereduce()method was called.
initialValue(optional): The initial value of the accumulator. If not provided, the first element of the array is used as the initial value, and the callback starts from the second element.
Here's an example of using reduce() to calculate the sum of all elements in an array:
const numbers = [1, 2, 3, 4, 5];

const sum = numbers.reduce((accumulator, currentValue) => {
  return accumulator + currentValue;
}, 0);

console.log(sum); // Output: 15
In this example, the reduce() method iterates over the numbers array, starting with an initial value of 0 for the accumulator. For each element, the callback function adds the current element's value to the accumulator. After all iterations, the final sum of all elements is stored in the sum variable.
reduce() is highly flexible and can be used to perform various operations on arrays, such as calculating sums, products, averages, and concatenating strings. It is a powerful method for deriving meaningful values from array elements and is commonly used in functional programming paradigms.
if else
In JavaScript, if and else are conditional statements that allow you to execute different blocks of code based on whether a certain condition is true or false. These statements are fundamental in controlling the flow of your program and making decisions based on various conditions.
The basic syntax of the if statement is as follows:
if (condition) {
  // Code block to execute if the condition is true
} else {
  // Code block to execute if the condition is false
}
condition: A JavaScript expression that evaluates to eithertrueorfalse. If the condition is true, the code block inside theifstatement is executed; otherwise, the code block inside theelsestatement (if provided) is executed.
Here's an example of using if and else:
const age = 25;

if (age >= 18) {
  console.log("You are an adult.");
} else {
  console.log("You are a minor.");
}
In this example, the if statement checks whether the age variable is greater than or equal to 18. If the condition is true (age is 18 or older), it will log "You are an adult." to the console. Otherwise, if the condition is false (age is younger than 18), it will log "You are a minor.".
You can also use the else if clause to chain multiple conditions together. Here's an example:
const score = 75;

if (score >= 90) {
  console.log("You got an A.");
} else if (score >= 80) {
  console.log("You got a B.");
} else if (score >= 70) {
  console.log("You got a C.");
} else {
  console.log("You got below a C.");
}
In this example, the program evaluates the score variable against different ranges to determine the grade. Depending on the value of score, it will log the corresponding grade to the console.
The if and else statements are essential for controlling the flow of your JavaScript code, enabling you to execute different blocks of code based on different conditions. They are foundational for implementing decision-making logic and making your programs more dynamic and responsive to different scenarios.
switch case
In JavaScript, the switch statement provides a way to perform multiple comparisons based on the value of an expression. It allows you to specify different code blocks to execute for different values of the expression. The switch statement is useful when you have a single expression that you want to compare against multiple possible values, rather than using a series of if and else if statements.
The basic syntax of the switch statement is as follows:
switch (expression) {
  case value1:
    // Code block to execute if expression matches value1
    break;
  case value2:
    // Code block to execute if expression matches value2
    break;
  // Add more cases as needed
  default:
    // Code block to execute if none of the cases match
}
expression: The expression whose value you want to compare.value1,value2, etc.: The values you want to compare the expression against. If the expression matches any of these values, the corresponding case block will be executed.default(optional): An optional case that is executed when none of the other cases match the expression.
The switch statement works as follows:
The
expressionis evaluated once.The value of the
expressionis compared with eachcasevalue.If a match is found, the code block associated with that
caseis executed.If no match is found and there is a
defaultcase, the code block inside thedefaultcase is executed.If no match is found and there is no
defaultcase, theswitchstatement is skipped entirely.
Here's an example of using switch:
javascriptCopy codeconst dayOfWeek = 3;
let dayName;

switch (dayOfWeek) {
  case 1:
    dayName = 'Sunday';
    break;
  case 2:
    dayName = 'Monday';
    break;
  case 3:
    dayName = 'Tuesday';
    break;
  case 4:
    dayName = 'Wednesday';
    break;
  case 5:
    dayName = 'Thursday';
    break;
  case 6:
    dayName = 'Friday';
    break;
  case 7:
    dayName = 'Saturday';
    break;
  default:
    dayName = 'Unknown';
}

console.log(`Today is ${dayName}.`);
In this example, the switch statement checks the value of dayOfWeek. Since dayOfWeek is 3, the case with value 3 matches, and the code block inside that case assigns the dayName variable to 'Tuesday'. The default case is not executed because there is a matching case for 3.
The switch statement is a clean and concise way to handle multiple cases of a single expression, making your code more organized and easier to read when you have multiple comparisons to perform.
for,for of , for in
In JavaScript, there are several types of loops that allow you to iterate over elements in an array, object, or other iterable data structures. The three commonly used loops are the for loop, the for...of loop, and the for...in loop. Each loop has its specific use case and syntax:
- For Loop: The
forloop is a traditional loop that allows you to execute a block of code repeatedly for a specified number of times. It is particularly useful when you need to loop a specific number of iterations.
Syntax:
for (initialization; condition; increment/decrement) {
  // Code to be executed in each iteration
}
Example:
for (let i = 0; i < 5; i++) {
  console.log(i);
}
// Output: 0, 1, 2, 3, 4
- For...of Loop: The
for...ofloop is used for iterating over elements in iterable objects like arrays, strings, sets, maps, etc. It simplifies the process of looping through the elements without the need for an index variable.
Syntax:
for (const element of iterable) {
  // Code to be executed for each element
}
Example:
javascriptCopy codeconst fruits = ['apple', 'banana', 'orange'];

for (const fruit of fruits) {
  console.log(fruit);
}
// Output: 'apple', 'banana', 'orange'
- For...in Loop: The
for...inloop is used to loop over the enumerable properties of an object. It iterates over the keys (property names) of the object.
Syntax:
for (const key in object) {
  if (object.hasOwnProperty(key)) {
    // Code to be executed for each property
  }
}
Example:
const person = {
  name: 'John',
  age: 30,
  city: 'New York'
};

for (const key in person) {
  console.log(key + ': ' + person[key]);
}
// Output: 'name: John', 'age: 30', 'city: New York'
It's essential to choose the appropriate loop based on the data you are working with. Use the for loop when you know the number of iterations, the for...of loop when iterating over iterable elements, and the for...in loop when dealing with object properties.
This keyword
https://www.instagram.com/p/CtiQmvkv9WI/
In JavaScript, the this keyword is a special keyword that refers to the context in which a function is executed or an object is accessed. It allows you to access and manipulate properties and methods within the current execution context.
The value of this is determined dynamically at runtime and can vary based on how a function is invoked. Here are some common use cases and behaviours of the this keyword:
- Global Scope: When used in the global scope (outside of any function),
thisrefers to the global object. In a web browser environment, the global object is typicallywindow.
console.log(this); // Refers to the global object (e.g., window in a browser)
- Object Method: When a function is called as a method of an object,
thisrefers to the object itself. It allows you to access the object's properties and methods.
const person = {
  name: "John",
  sayHello: function() {
    console.log(`Hello, my name is ${this.name}`);
  }
};

person.sayHello(); // Output: Hello, my name is John
- Constructor Function: When a function is used as a constructor function with the
newkeyword,thisrefers to the newly created instance of the object. It allows you to set properties on the instance.
function Person(name) {
  this.name = name;
}

const john = new Person("John");
console.log(john.name); // Output: John
- Event Handlers: When a function is used as an event handler,
thistypically refers to the DOM element on which the event occurred. It allows you to access and manipulate properties of the element.
const button = document.querySelector("button");
button.addEventListener("click", function() {
  console.log(this); // Refers to the button element
});
- Function Context: The value of
thisin a regular function depends on how the function is invoked. It can be influenced by the use of explicit binding methods likecall(),apply(), orbind(), which allow you to explicitly set the value ofthiswithin the function.
function greet() {
  console.log(`Hello, ${this.name}`);
}

const person = { name: "John" };

greet.call(person); // Output: Hello, John
Understanding the behavior of the this keyword is crucial in JavaScript, as it allows you to access and interact with the appropriate context or object within your code.
Hoisting
Hoisting is a behavior in JavaScript where variable and function declarations are moved to the top of their containing scope during the compilation phase, before the code is executed. This means that you can use variables and call functions before they are declared in your code.
However, it's important to note that only the declarations are hoisted, not the initializations or assignments. Let's take a look at some examples to understand how hoisting works:
Example 1: Variable Hoisting
console.log(x); // undefined
var x = 10;
In this example, the variable x is hoisted to the top of the scope (global or function scope). However, its value is not hoisted, so when we try to access it before the declaration, it will be undefined.
Example 2: Function Hoisting
foo(); // "Hello, world!"

function foo() {
  console.log("Hello, world!");
}
In this example, the function foo() is hoisted to the top of the scope, so we can call it before its declaration. The function declaration is moved to the top, allowing us to execute it without any error.
However, it's important to be aware of the differences between function declarations and function expressions when it comes to hoisting. Function declarations are hoisted entirely, whereas function expressions are not. Only the variable declaration is hoisted in the case of function expressions.
Example 3: Function Expression Hoisting
foo(); // TypeError: foo is not a function

var foo = function() {
  console.log("Hello, world!");
};
In this example, the variable foo is hoisted to the top, but its value, which is a function expression, is not hoisted. Therefore, when we try to call foo() before the variable assignment, we get a TypeError.
To avoid confusion and potential issues, it is recommended to declare variables at the top of their scope and define functions before using them. This practice promotes code readability and avoids unexpected behavior due to hoisting.
Overall, hoisting is a JavaScript behavior that allows you to use variables and call functions before they are declared in your code. However, it's important to understand how hoisting works to write clean and maintainable code.
closures
Closures in JavaScript refer to the combination of a function and its lexical environment. A closure occurs when a function is defined inside another function (the outer function), and the inner function retains access to the variables, parameters, and scope of the outer function, even after the outer function has finished executing.
Closures are a powerful and important concept in JavaScript. They occur when a function is defined inside another function (the outer function), and the inner function has access to the variables and parameters of the outer function, even after the outer function has finished executing. In other words, the inner function "closes over" the variables of the outer function, and this combination of the function and its lexical environment forms a closure.
Here's a simplified explanation of closures with an example:
javascriptCopy codefunction outerFunction() {
  const outerVar = 'I am from the outer function';

  function innerFunction() {
    console.log(outerVar); // Accessing outerVar from the outer function
  }

  return innerFunction; // Returning the inner function from the outer function
}

const closureExample = outerFunction(); // closureExample now holds the inner function

closureExample(); // Output: 'I am from the outer function'
In this example, the outerFunction defines a variable outerVar and a nested function innerFunction. The innerFunction has access to outerVar, which is a variable from its lexical environment (the outer function). When outerFunction is called and returns innerFunction, it creates a closure. The closure retains a reference to the outerVar, even after outerFunction has finished executing.
Closures are powerful because they allow functions to "remember" and access the scope in which they were created, even when executed in a different context. They are widely used in JavaScript for various purposes, such as creating private variables, implementing data hiding, and managing state in functional programming.
Here's an example demonstrating how closures can be used to create private variables:
javascriptCopy codefunction createCounter() {
  let count = 0;

  return function () {
    return ++count;
  };
}

const counter = createCounter();

console.log(counter()); // Output: 1
console.log(counter()); // Output: 2
In this example, the createCounter function returns an inner function that increments a count variable. The count variable is private to the returned function and cannot be accessed from outside. The closure ensures that the count variable is preserved between multiple calls to the returned function, allowing the counter to work correctly.
Closures are a fundamental aspect of JavaScript's functional nature, and understanding them is crucial for advanced JavaScript development and solving certain programming challenges effectively.
Destructuring
Destructuring is a powerful feature in JavaScript that allows you to extract values from arrays or objects and assign them to variables in a concise and convenient way. It simplifies the process of accessing nested data structures and makes the code more readable and expressive.
There are two types of destructuring in JavaScript:
Array Destructuring:
Array destructuring allows you to unpack values from an array into individual variables.
The syntax uses square brackets
[]on the left-hand side of the assignment.
Example of array destructuring:
javascriptCopy codeconst numbers = [1, 2, 3];

// Destructuring the array into individual variables
const [a, b, c] = numbers;

console.log(a); // Output: 1
console.log(b); // Output: 2
console.log(c); // Output: 3
Object Destructuring:
Object destructuring allows you to extract values from an object into individual variables based on their property names.
The syntax uses curly braces
{}on the left-hand side of the assignment.
Example of object destructuring:
javascriptCopy codeconst person = {
  name: 'John',
  age: 30,
  city: 'New York'
};

// Destructuring the object into individual variables
const { name, age, city } = person;

console.log(name); // Output: 'John'
console.log(age); // Output: 30
console.log(city); // Output: 'New York'
You can also use aliases while destructuring to assign variables with different names:
javascriptCopy codeconst person = {
  name: 'John',
  age: 30,
  city: 'New York'
};

// Destructuring the object with aliases
const { name: fullName, age: personAge, city: location } = person;

console.log(fullName); // Output: 'John'
console.log(personAge); // Output: 30
console.log(location); // Output: 'New York'
Destructuring is not only limited to top-level arrays and objects but can also be used with nested structures. Here's an example:
javascriptCopy codeconst nestedData = {
  first: [1, 2, 3],
  second: { a: 4, b: 5, c: 6 }
};

const {
  first: [x, y, z],
  second: { a, b, c }
} = nestedData;

console.log(x, y, z); // Output: 1 2 3
console.log(a, b, c); // Output: 4 5 6
Destructuring is a handy feature in modern JavaScript, and it's commonly used to access and extract values from arrays and objects, especially when working with API responses, function parameters, or complex data structures. It improves code readability, reduces boilerplate code, and simplifies data manipulation tasks.
rest operator
The rest operator (...) in JavaScript is used to represent an indefinite number of function arguments as an array. It allows a function to accept multiple arguments without explicitly defining them in the function parameter list. The rest operator collects the remaining arguments passed to a function and puts them into an array.
Here's how the rest operator is used in function parameters:
function sum(...numbers) {
  return numbers.reduce((total, num) => total + num, 0);
}

console.log(sum(1, 2, 3, 4, 5)); // Output: 15
In this example, the sum function accepts any number of arguments. The rest operator ...numbers collects all the arguments passed to the function and stores them in an array called numbers. The reduce method is then used to calculate the sum of the numbers in the array.
The rest operator can also be used in array destructuring to collect the remaining elements into a new array:
const [first, second, ...rest] = [1, 2, 3, 4, 5];

console.log(first);  // Output: 1
console.log(second); // Output: 2
console.log(rest);   // Output: [3, 4, 5]
In this example, the rest operator ...rest collects the remaining elements of the array [1, 2, 3, 4, 5] after assigning the values of first and second. The rest of the elements are then assigned to the rest array.
The rest operator allows you to handle a varying number of function arguments or extract specific elements from an array while collecting the rest into a new array. It provides flexibility and simplifies working with variable-length argument lists or arrays with unknown lengths.
spread operator
The spread operator (...) in JavaScript is used to expand or unpack elements from an iterable (like an array or string) into individual elements. It allows you to create copies of arrays, merge arrays or objects, and pass multiple elements as function arguments conveniently.
Here are some common use cases of the spread operator:
Array Expansion:
You can use the spread operator to create a new array by expanding the elements of an existing array.
Example:
  const arr = [1, 2, 3];
  const newArr = [...arr];

  console.log(newArr); // Output: [1, 2, 3]
Array Concatenation:
The spread operator can be used to concatenate multiple arrays into a single array.
Example:
  javascriptCopy codeconst arr1 = [1, 2];
  const arr2 = [3, 4];
  const concatenated = [...arr1, ...arr2];

  console.log(concatenated); // Output: [1, 2, 3, 4]
Object Expansion:
The spread operator can also be used to create a new object by merging the properties of existing objects.
Example:
  javascriptCopy codeconst obj1 = { a: 1, b: 2 };
  const obj2 = { c: 3, d: 4 };
  const merged = { ...obj1, ...obj2 };

  console.log(merged); // Output: { a: 1, b: 2, c: 3, d: 4 }
Function Arguments:
The spread operator can be used to pass multiple elements as arguments to a function.
Example:
  javascriptCopy codefunction sum(a, b, c) {
    return a + b + c;
  }

  const numbers = [1, 2, 3];
  const result = sum(...numbers);

  console.log(result); // Output: 6
String Expansion:
The spread operator can be used to convert a string into an array of individual characters.
Example:
  javascriptCopy codeconst str = "Hello";
  const chars = [...str];

  console.log(chars); // Output: ["H", "e", "l", "l", "o"]
The spread operator provides a concise and powerful way to work with arrays, objects, and function arguments in JavaScript. It simplifies the process of copying, merging, or expanding elements, improving code readability and reducing the need for traditional looping or concatenation methods.
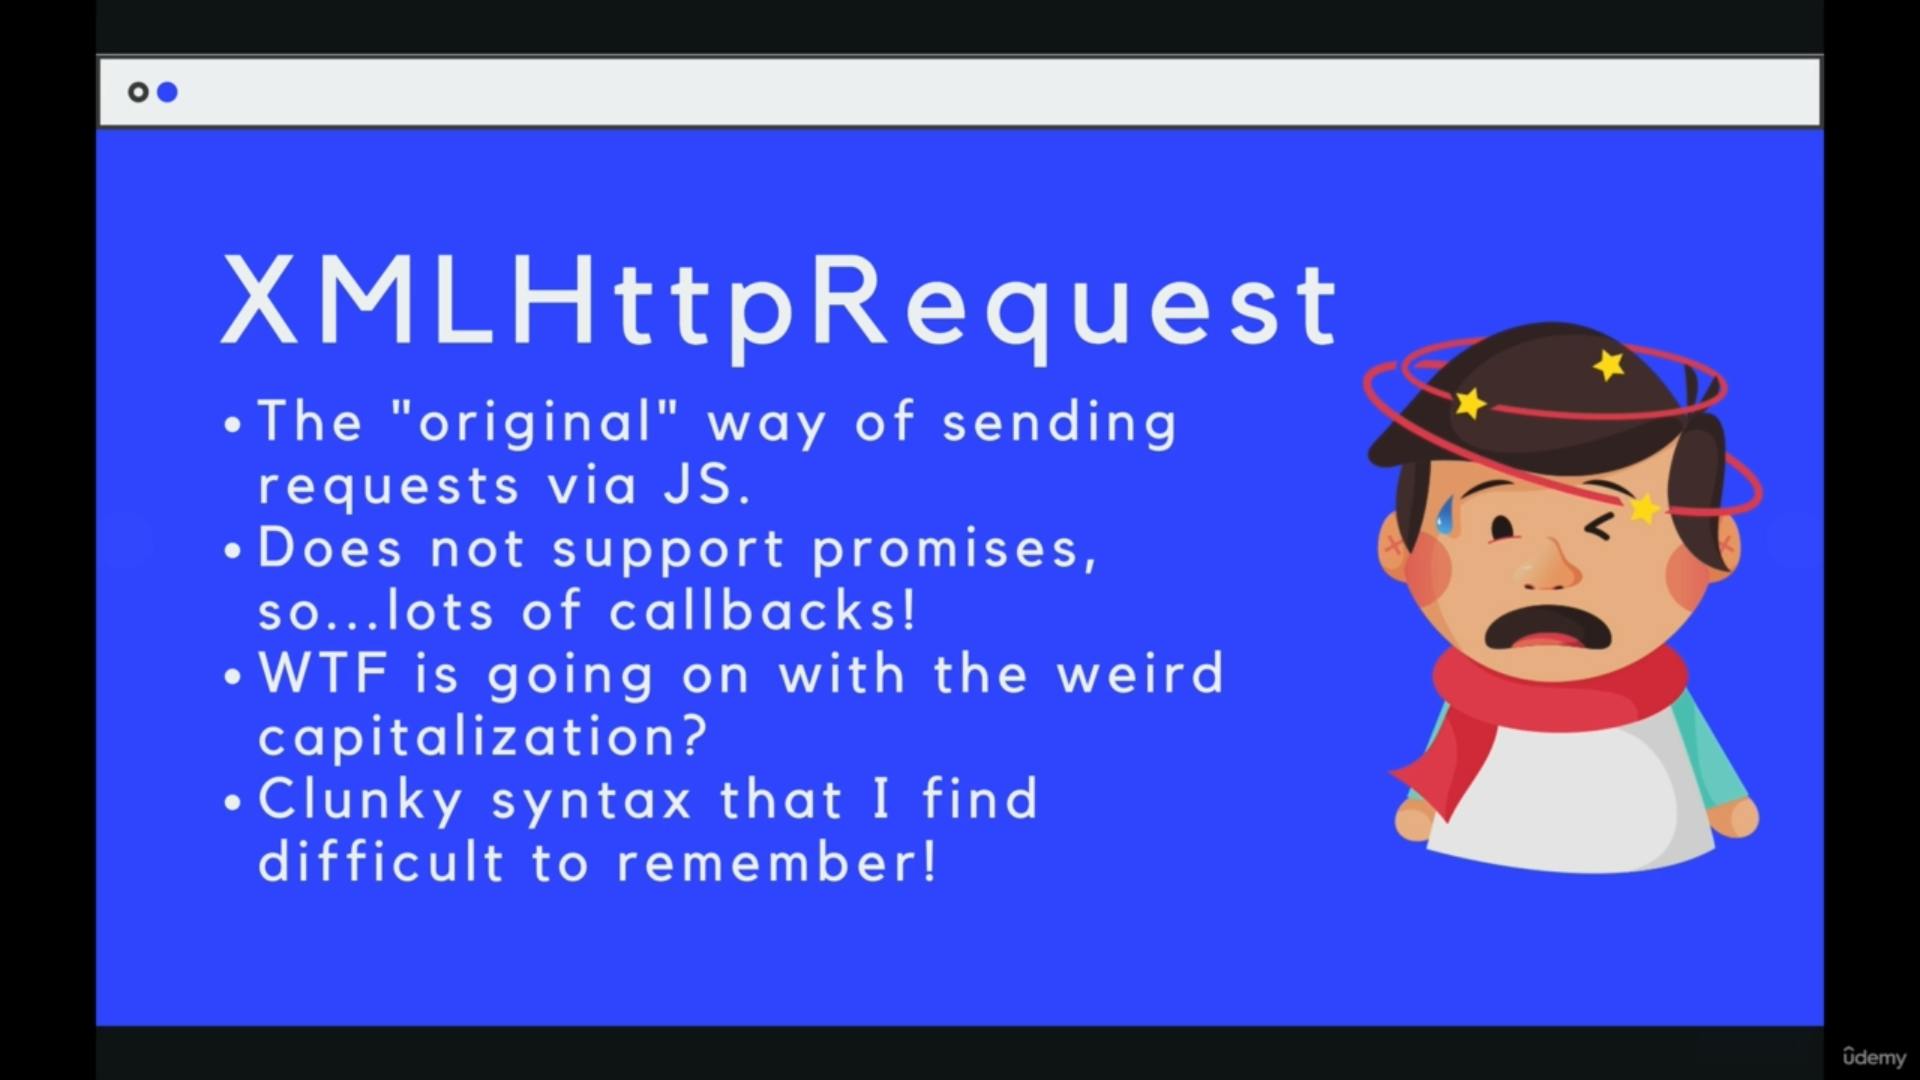
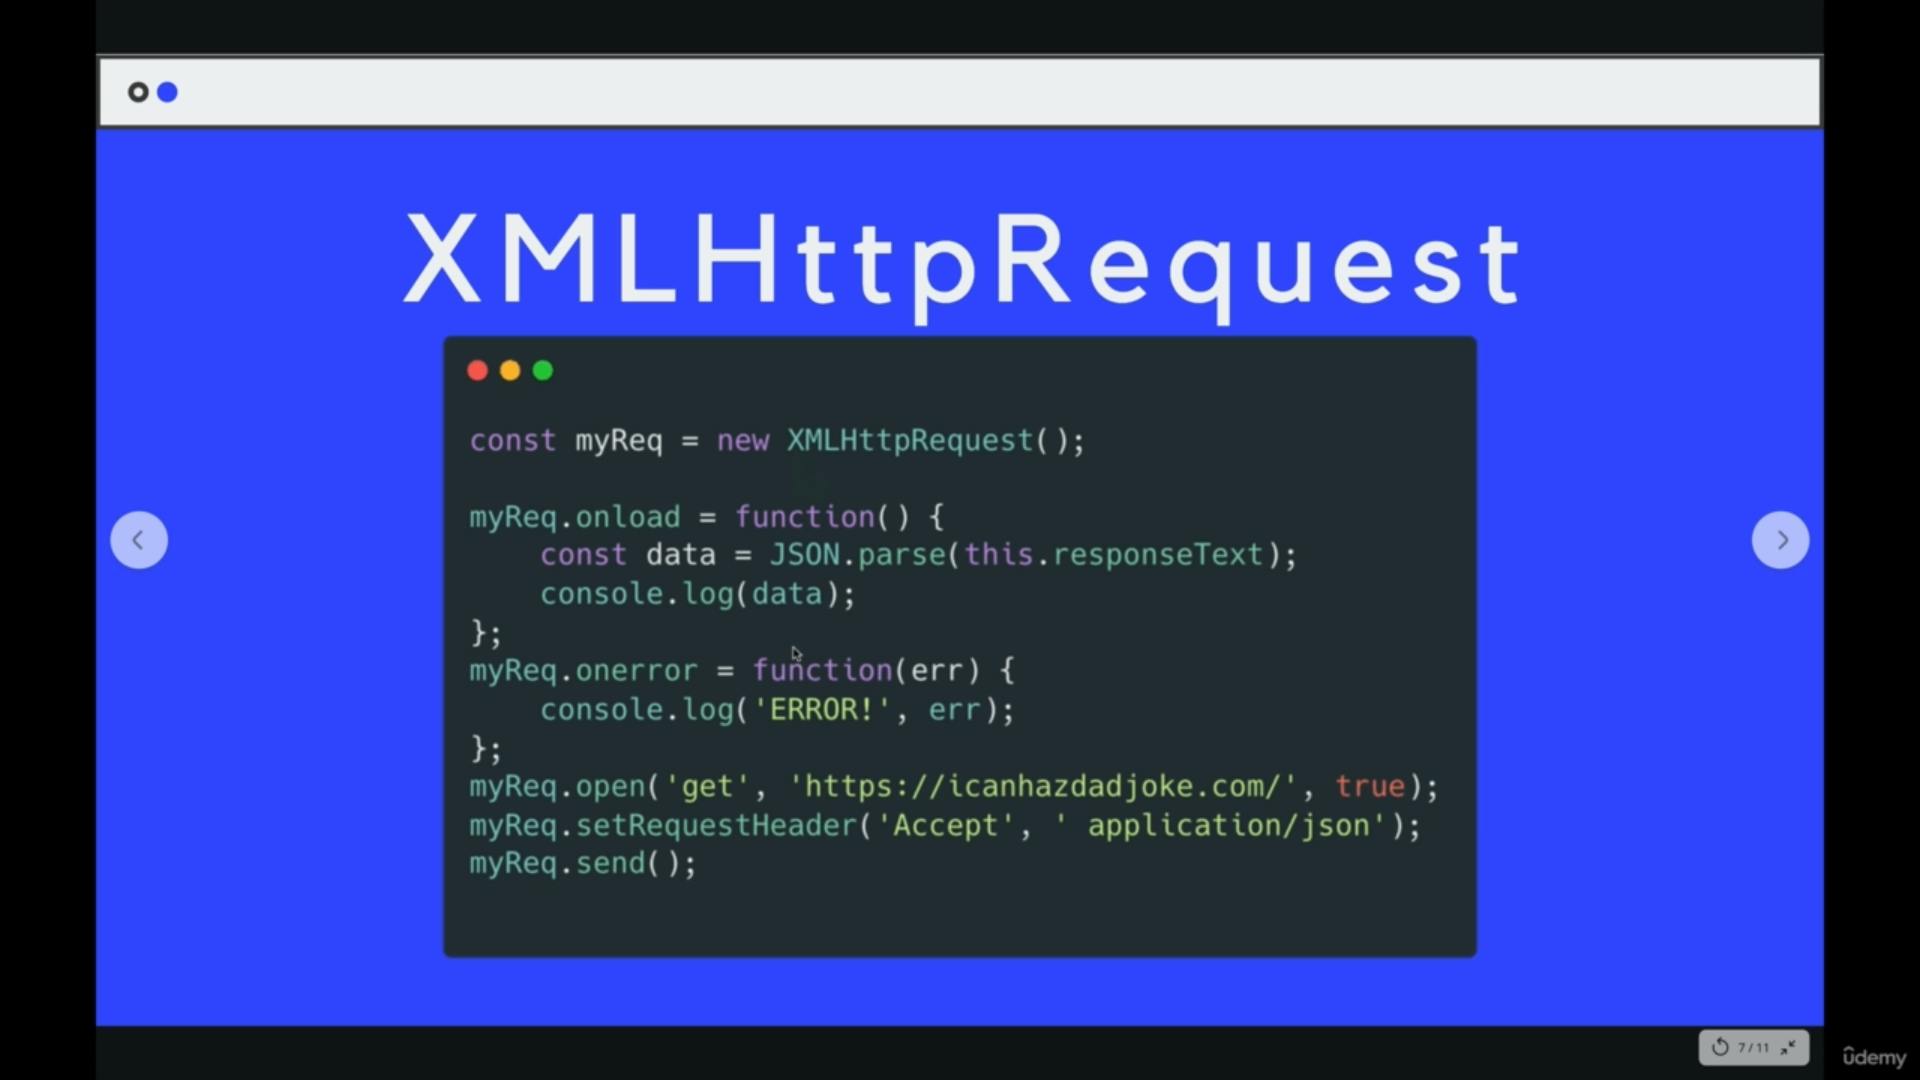
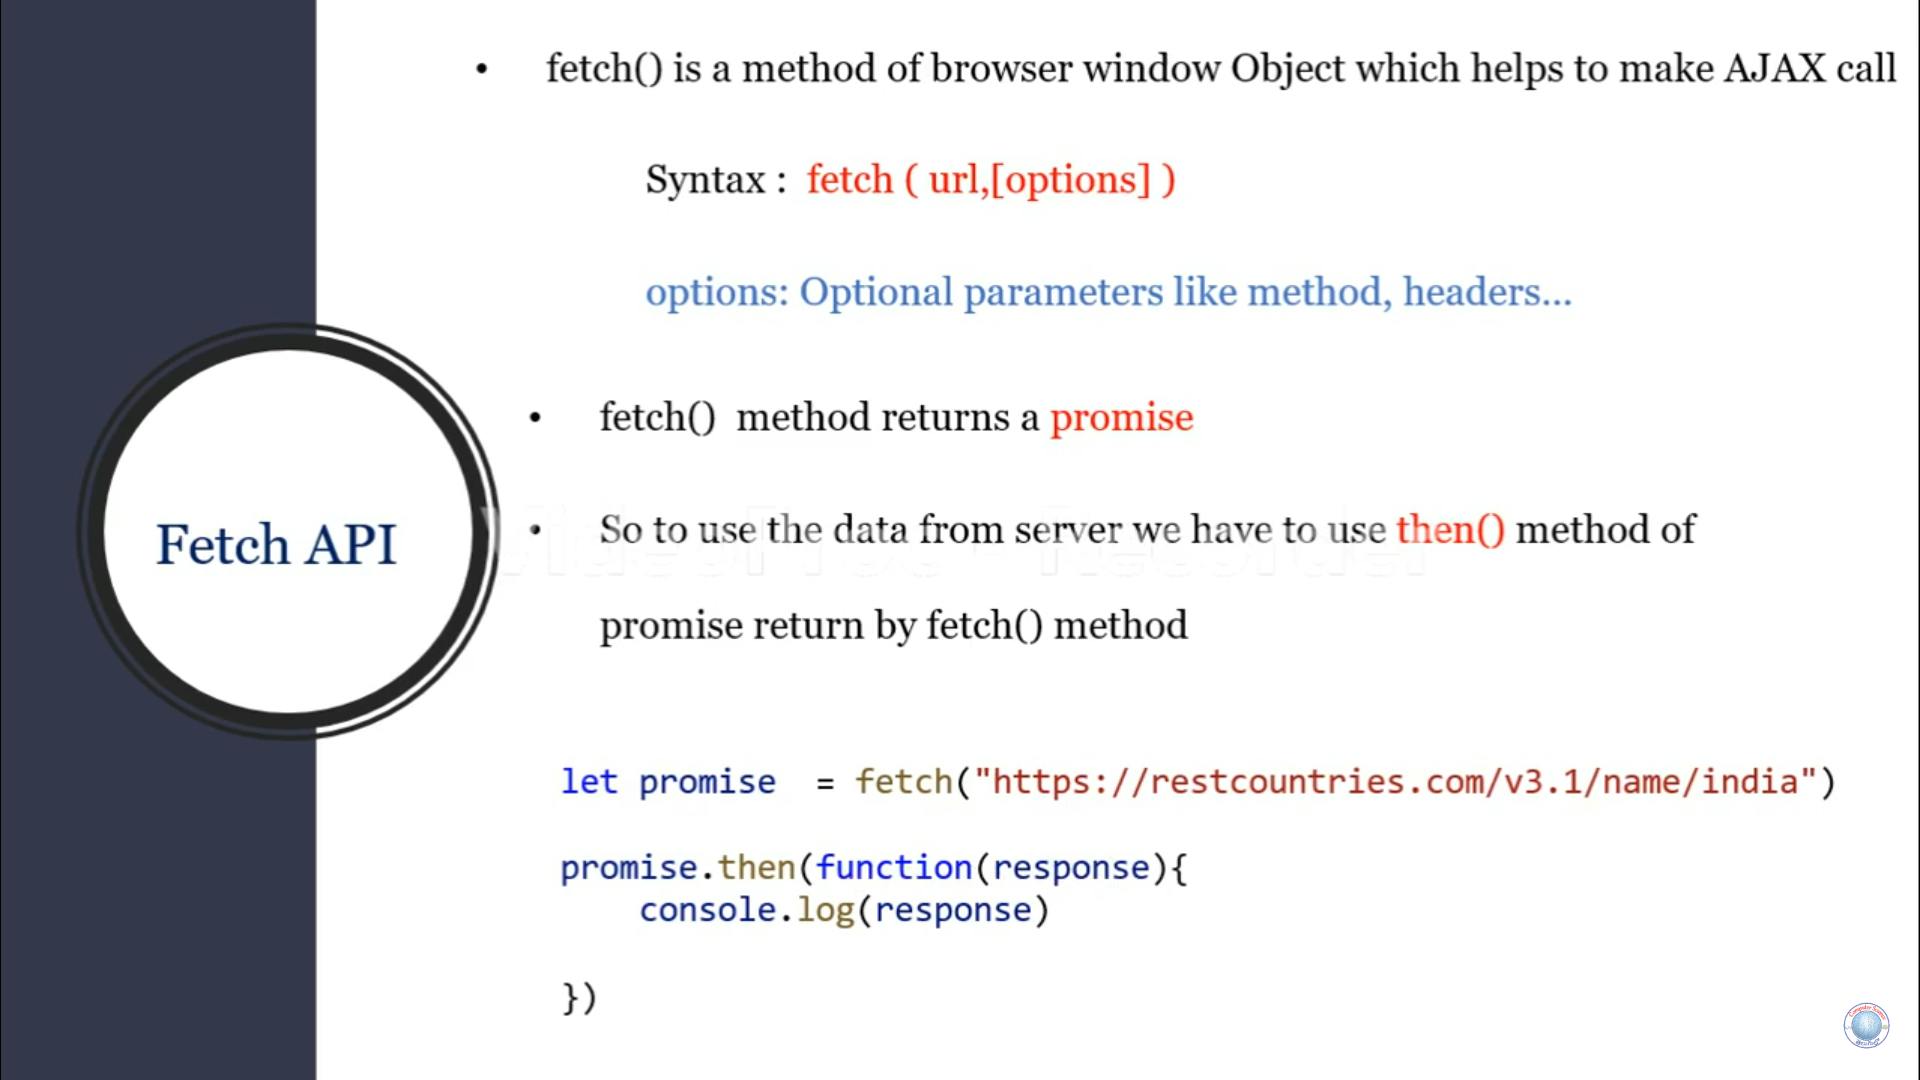
JSON
Fetch API
Callback Hell
Asynchronous js
promises
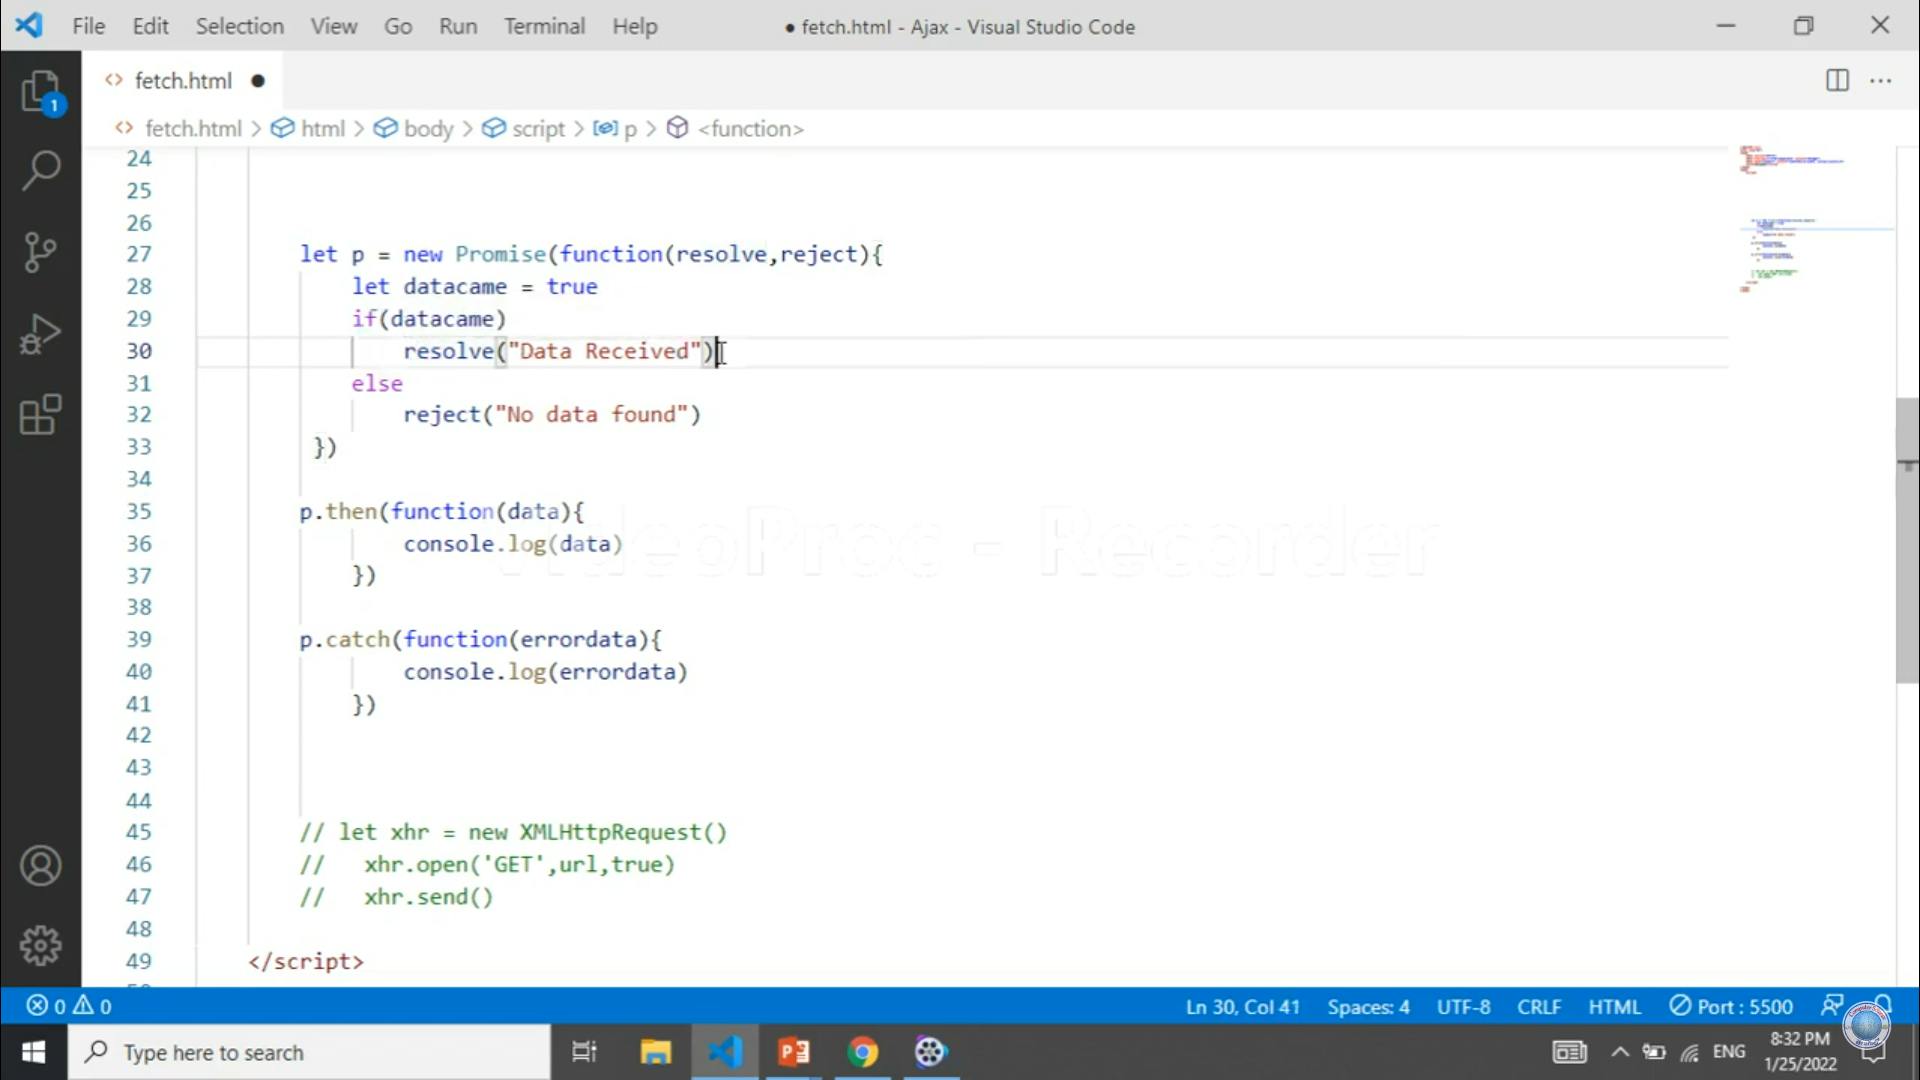
Promises are an essential part of modern JavaScript for handling asynchronous operations. They provide a cleaner and more structured way to work with asynchronous code, such as making API requests, reading files, or fetching data from a server. Promises are objects that represent the eventual completion or failure of an asynchronous operation, and they allow you to handle the results when they are ready.
Creating a Promise: A Promise is created using the Promise constructor, which takes a function (often called the "executor") as its argument. The executor function has two parameters: resolve and reject. Inside the executor function, you perform the asynchronous operation and call either resolve(value) when the operation is successful, or reject(error) when it encounters an error.
Syntax:
const myPromise = new Promise((resolve, reject) => {
  // Perform asynchronous operation
  // If successful, call resolve(value)
  // If an error occurs, call reject(error)
});
Promise States: Promises have three possible states:
Pending: The initial state when the Promise is created and the asynchronous operation is still ongoing.
Fulfilled (Resolved): The state when the asynchronous operation is successfully completed, and the Promise's
resolvefunction is called with a value.Rejected: The state when the asynchronous operation encounters an error, and the Promise's
rejectfunction is called with an error.
Chaining Promises: One of the key advantages of Promises is their ability to chain multiple asynchronous operations together. This is achieved using .then() and .catch() methods. The .then() method is used to handle the fulfilled state, while the .catch() method is used to handle the rejected state.
Example: Fetching Data from a Server using Promise:
function fetchData() {
  return new Promise((resolve, reject) => {
    // Simulate fetching data from a server
    setTimeout(() => {
      const data = { id: 1, name: 'John Doe' };
      // Resolve with the fetched data
      resolve(data);
      // If an error occurs during fetching, reject with an error
      // reject('Error: Unable to fetch data');
    }, 1000);
  });
}

fetchData()
  .then((data) => {
    console.log('Data:', data); // Output: { id: 1, name: 'John Doe' }
  })
  .catch((error) => {
    console.log('Error:', error); // Output: 'Error: Unable to fetch data'
  });
In this example, the fetchData() function returns a Promise. After 1 second (simulated delay), the Promise resolves with the fetched data. If an error occurs (by uncommenting the reject call), the Promise will reject with an error message. We then chain .then() to handle the resolved data and .catch() to handle any errors that may occur.
Promises are an integral part of modern JavaScript, and they significantly improve the way we handle asynchronous operations. They provide a more structured and organized approach to handling asynchronous code, leading to cleaner and more maintainable codebases. Additionally, Promises are widely supported across modern browsers and Node.js versions. However, with the introduction of async/await in ES8, working with Promises has become even more convenient and readable.
let g= new Promise((res,rej)=>{
let num=false;
if(num){
  res()
}
else{
  rej()
}
})

g
.then(()=>{
console.log("sucesss")
})
.catch(()=>{
  console.log("error")
})
Async/Await
Async/await is a powerful feature introduced in ECMAScript 2017 (ES8) that provides a more straightforward and synchronous-looking way to work with asynchronous code in JavaScript. It is built on top of Promises and provides a more readable and structured syntax for handling asynchronous operations.
Async Function: To use async/await, you declare an async function. An async function always returns a Promise, and inside the function, you can use the await keyword to pause the execution until a Promise is resolved or rejected.
Await Keyword: The await keyword is used to wait for the resolution of a Promise. When you use await inside an async function, it suspends the execution of the function until the Promise is settled (resolved or rejected). The function will then resume its execution with the resolved value if the Promise was resolved, or it will throw an error if the Promise was rejected.
Syntax:
async function functionName() {
  try {
    const result = await someAsyncFunction();
    // Code to execute after the Promise is resolved
  } catch (error) {
    // Code to handle errors if the Promise is rejected
  }
}
Using async/await with Promises: To better understand async/await, let's compare it with the equivalent code using Promises:
Using Promises:
function fetchUserData() {
  return new Promise((resolve, reject) => {
    setTimeout(() => {
      const user = { id: 1, name: 'John Doe' };
      resolve(user); // Resolve the Promise after a delay
    }, 1000);
  });
}

function getUserData() {
  return fetchUserData()
    .then((user) => {
      console.log(user); // Output: { id: 1, name: 'John Doe' }
    })
    .catch((error) => {
      console.log('Error:', error);
    });
}

getUserData();
Using async/await:
function fetchUserData() {
  return new Promise((resolve, reject) => {
    setTimeout(() => {
      const user = { id: 1, name: 'John Doe' };
      resolve(user); // Resolve the Promise after a delay
    }, 1000);
  });
}

async function getUserData() {
  try {
    const user = await fetchUserData();
    console.log(user); // Output: { id: 1, name: 'John Doe' }
  } catch (error) {
    console.log('Error:', error);
  }
}

getUserData();
As you can see, using async/await provides a more concise and synchronous-like code structure compared to Promises. It allows you to write asynchronous code in a more natural way, making it easier to read and maintain. Additionally, using try-catch blocks with async/await simplifies error handling, and it feels more like traditional synchronous error handling.
Error Handling: Async/await also simplifies error handling. If a Promise is rejected within an async function, the error can be caught using a try-catch block. This way, you can handle errors more cleanly and avoid nested .then() and .catch() chains.
Handling Multiple Async Operations: You can use await with multiple asynchronous operations, and they will execute sequentially. If you need to execute multiple operations concurrently, you can use Promise.all() with await to wait for all the Promises to be resolved.
Async Functions and Return Values: Async functions always return a Promise, whether explicitly with return or implicitly if nothing is returned. The resolved value of the Promise is the value returned by the async function.
Async/Await vs. Promises: While async/await provides a more readable and synchronous-looking code, it is important to note that it is built on top of Promises. Under the hood, async/await still relies on Promises, and it is fully compatible with existing Promise-based code.
In summary, async/await is a significant enhancement to JavaScript's asynchronous capabilities. It simplifies asynchronous code, reduces callback nesting, and makes it easier to work with Promises. It has become the preferred way to handle asynchronous operations in modern JavaScript development.
Ajax

normally using promises
// let a = fetch("https://dummyjson.com/products/categories")

// a.then((q)=>{

//     q.json().then((w)=>{
//         console.log(w);
//     })
// })

async function y(){

    let q=await fetch("https://dummyjson.com/products/categories");

    let w=await q.json();
    console.log(w);
}
y()
console.log("hjhjjhj");