react interview


Components
In React, components are the building blocks of a user interface. They are reusable and modular pieces of code that encapsulate the logic, structure, and behavior of a specific part of a user interface. React components allow you to create complex UIs by breaking them down into smaller, manageable pieces.
There are two main types of components in React: functional components and class components.
- Functional Components: Functional components, also known as stateless components, are defined as JavaScript functions. They are the simplest and most common type of components in React. A functional component receives props (input data) as parameters and returns JSX (a representation of the component's UI) as the output.
Here's an example of a functional component that displays a simple "Hello, World!" message:
jsxCopy codeimport React from 'react';

function HelloWorld() {
  return <div>Hello, World!</div>;
}
- Class Components: Class components are JavaScript classes that extend the
React.Componentbase class. They have more features than functional components, such as lifecycle methods and local state management. Class components are used when you need to manage state or perform more advanced operations.
Here's an example of a class component that displays a message based on its state:
jsxCopy codeimport React, { Component } from 'react';

class Message extends Component {
  constructor(props) {
    super(props);
    this.state = {
      text: 'Hello, World!',
    };
  }

  render() {
    return <div>{this.state.text}</div>;
  }
}
Regardless of the type of component, they can receive data and communicate with other components through props. Props are passed to components as attributes and are read-only, meaning they cannot be modified within the component. Props allow you to customize and configure components dynamically based on the data passed from their parent components.
Components can be composed together to create complex user interfaces. They can be nested, allowing for a hierarchical structure where components can be reused and combined in various ways.
React components have a unidirectional data flow, meaning that data flows from parent components to child components through props. When the data changes, React efficiently updates only the affected components and re-renders the UI accordingly, resulting in efficient and performant applications.
Overall, components are the core building blocks of React applications. They encapsulate functionality, enable code reusability, and allow for the creation of modular, maintainable, and scalable user interfaces.
Props
In React, "props" is a short form of "properties" and refers to the input data that is passed into a React component. Props allow you to pass data from a parent component to its child component(s), enabling communication and sharing of information between different parts of your application.
Here's an explanation of props in React:
- Passing Props: Props are passed from a parent component to a child component as attributes in JSX when the child component is rendered. The parent component can provide values for these attributes dynamically.
function ParentComponent() {
  const name = 'John';
  const age = 30;

  return <ChildComponent name={name} age={age} />;
}
In this example, the name and age variables are passed as props to the ChildComponent by providing them as attributes in the JSX.
- Receiving Props: The child component can access and use the props passed to it by defining a function or a functional component and specifying the
propsparameter.
function ChildComponent(props) {
  return (
    <div>
      <p>Name: {props.name}</p>
      <p>Age: {props.age}</p>
    </div>
  );
}
In this example, the ChildComponent receives the props via the props parameter and can access specific prop values using dot notation (props.name and props.age).
Alternatively, you can use destructuring to directly extract specific props:
function ChildComponent({ name, age }) {
  return (
    <div>
      <p>Name: {name}</p>
      <p>Age: {age}</p>
    </div>
  );
}
In this destructuring example, the name and age props are extracted from the props object, allowing you to directly use name and age as variables in the component.
- Using Props: Once the child component receives the props, it can use them to render dynamic content or perform any necessary logic based on the passed data. Props are read-only, meaning they cannot be modified within the child component.
function ChildComponent({ name, age }) {
  return (
    <div>
      <p>Name: {name}</p>
      <p>Age: {age}</p>
      {age >= 18 && <p>Adult</p>}
    </div>
  );
}
In this example, the ChildComponent renders the name and age values received as props. Additionally, it conditionally renders an "Adult" message based on the age prop using a simple logic check.
Props play a crucial role in React components as they enable communication and data flow between components. They allow you to pass data from parent components to child components, making your components more reusable and flexible. By leveraging props, you can create dynamic and interactive UIs in React applications.
React events
https://www.w3schools.com/REACT/react_events.asp
In React, event handling is a fundamental aspect that allows you to respond to user interactions or actions within your components. React provides a synthetic event system that abstracts away the differences between browser implementations and provides a consistent interface for handling events.
Here's an overview of how event handling works in React:
Event Binding: To handle events in React, you bind event handlers to specific elements or components. Event handlers are functions that get executed when a specific event occurs, such as a button click or a form submission.
Event Handling Syntax: In JSX, you attach event handlers by using special attributes that start with
on. For example, to handle a button click event, you would use theonClickattribute.
jsxCopy code<button onClick={handleClick}>Click me</button>
In the example above, handleClick is the event handler function that will be called when the button is clicked.
- Event Handler Function: Event handler functions in React follow a specific convention. They typically take an event object as their parameter, representing the event that occurred. You can access information about the event, such as the target element or the value of an input field, using the event object.
jsxCopy codefunction handleClick(event) {
  // Access event information
  console.log('Button clicked!', event.target);
}
- Preventing Default Behavior: In some cases, you may want to prevent the default behavior of certain events, such as preventing a form from being submitted or preventing a link from navigating to a new page. You can use the
event.preventDefault()method within your event handler to prevent the default behavior.
jsxCopy codefunction handleSubmit(event) {
  event.preventDefault();
  // Perform custom logic
}
- Passing Arguments to Event Handlers: If you need to pass additional arguments to an event handler function, you can use an arrow function or the
bind()method to create a new function with the desired arguments.
jsxCopy code<button onClick={() => handleClick(arg1, arg2)}>Click me</button>
jsxCopy code<button onClick={handleClick.bind(null, arg1, arg2)}>Click me</button>
Event Propagation: In React, events follow a process called event propagation or event bubbling. When an event occurs on a specific element, it propagates up through the DOM tree, triggering event handlers on ancestor elements if they are defined. This allows you to handle events at different levels of your component hierarchy.
Synthetic Events: React uses a synthetic event system that normalizes event handling across different browsers. The synthetic event is a wrapper around the native browser event and provides a consistent interface for accessing event properties and methods.
These are the key concepts involved in event handling in React. By attaching event handlers to elements and components, you can respond to user interactions and update your application's state or trigger other actions. React's synthetic event system simplifies event handling and provides a consistent and efficient way to handle events in your components.
React Lists
In React, rendering lists of elements dynamically is a common requirement. Whether you have an array of data or need to generate a set of components based on certain conditions, React provides several approaches for rendering lists efficiently. Here are the main techniques for rendering lists in React:
- Using JavaScript map() method: You can use the JavaScript
map()method to iterate over an array and generate a list of components or elements. Inside themap()function, you can return a JSX expression for each item in the array. React will automatically render each item as a separate element. Here's an example:
function MyList() {
  const numbers = [1, 2, 3, 4, 5];

  return (
    <ul>
      {numbers.map((number) => (
        <li key={number}>{number}</li>
      ))}
    </ul>
  );
}
In this example, the map() method is used to generate a list of <li> elements for each number in the numbers array.
- Using a component to render each item: If you need to render more complex components for each item in the list, you can create a separate component and pass the data as props. This allows for better separation of concerns and reusability. Here's an example:
function MyList() {
  const items = [
    { id: 1, name: 'Item 1' },
    { id: 2, name: 'Item 2' },
    { id: 3, name: 'Item 3' },
  ];

  return (
    <ul>
      {items.map((item) => (
        <ListItem key={item.id} name={item.name} />
      ))}
    </ul>
  );
}

function ListItem({ name }) {
  return <li>{name}</li>;
}
In this example, the MyList component renders a list of ListItem components based on the items array.
- Using keys for efficient updates: When rendering lists in React, it's important to provide a unique
keyprop for each item. Keys help React identify which items have changed, been added, or been removed, improving the performance of list updates. The key should be a stable identifier, such as an ID or a unique attribute of the item. Make sure the key is unique among siblings, but it doesn't need to be globally unique.
function MyList() {
  const items = [
    { id: 1, name: 'Item 1' },
    { id: 2, name: 'Item 2' },
    { id: 3, name: 'Item 3' },
  ];

  return (
    <ul>
      {items.map((item) => (
        <li key={item.id}>{item.name}</li>
      ))}
    </ul>
  );
}
In this example, the id property is used as the key for each <li> element.
By using these techniques, you can dynamically render lists of components or elements in React. Whether you have a simple array of data or more complex data structures, React's ability to efficiently handle list rendering makes it easy to create dynamic and interactive user interfaces.
React conditional rendering
React conditional rendering is a technique that allows you to conditionally render different parts of your user interface based on certain conditions or state values. It enables you to display different content, components, or styles based on dynamic factors, such as user input, API responses, or application state.
There are several ways to implement conditional rendering in React, depending on the complexity of the condition and the desired outcome. Here are a few common techniques:
- Using if statements or ternary operators: You can use regular JavaScript if statements or ternary operators within your JSX code to conditionally render elements. Here's an example:
function App() {
  const isLoggedIn = true;

  return (
    <div>
      {isLoggedIn ? <p>Welcome, user!</p> : <p>Please log in.</p>}
    </div>
  );
}
In the example above, the isLoggedIn variable determines whether to render the "Welcome, user!" message or the "Please log in." message.
- Using logical && operator: You can use the logical AND (
&&) operator to conditionally render an element or component. If the condition before the&&operator evaluates totrue, the element after it is rendered. Otherwise, nothing is rendered. Here's an example:
function App() {
  const isLoggedIn = true;

  return (
    <div>
      {isLoggedIn && <p>Welcome, user!</p>}
    </div>
  );
}
In this case, the <p>Welcome, user!</p> element is only rendered if isLoggedIn is true.
- Using switch statements or object mapping: For more complex conditions, you can use switch statements or object mapping to determine which component or content to render. Here's an example using a switch statement:
jsxCopy codefunction App() {
  const status = 'success';

  let message;
  switch (status) {
    case 'success':
      message = <p>Operation successful.</p>;
      break;
    case 'error':
      message = <p>An error occurred.</p>;
      break;
    default:
      message = <p>Unknown status.</p>;
  }

  return (
    <div>
      {message}
    </div>
  );
}
In this example, the status variable determines which message to display based on different cases.
Conditional rendering allows you to create dynamic user interfaces that adapt to different scenarios or conditions. It helps you control what is rendered based on changing data or user interactions, providing a flexible and interactive experience for your users.
virtual dom
The Virtual DOM (Document Object Model) is a concept used in frameworks like React to optimize the performance of web applications.
The DOM is a tree-like representation of the HTML elements of a web page. Each time there is a change in the application's state or data, the entire DOM tree needs to be updated, which can be computationally expensive.
To address this issue, the Virtual DOM was introduced,When updates are made to the Virtual DOM, it compares the updated version with the previous version, known as reconciliation. It identifies the differences between the two versions and creates a minimal set of changes (or patches) needed to update the real DOM. This process is known as "diffing."
Conditional rendering
Conditional rendering in React refers to the ability to display different components or content based on certain conditions or values. It allows you to dynamically show or hide elements, render alternative components, or adjust the UI based on the state of your application.
In React, you can achieve conditional rendering using various techniques:
- If statements: You can use standard JavaScript if statements or ternary operators inside your component's render method to conditionally render different content or components based on a condition. For example:
render() {
  if (condition) {
    return <ComponentA />;
  } else {
    return <ComponentB />;
  }
}
- && operator: You can use the && operator to conditionally render a component or content by evaluating a condition. If the condition is truthy, the component or content after the && operator will be rendered. For example:
jsxCopy coderender() {
  return (
    <div>
      {isLoggedIn && <UserGreeting />}
      {!isLoggedIn && <GuestGreeting />}
    </div>
  );
}
- Conditional operator (ternary operator): The ternary operator (
condition ? expression1 : expression2) is a concise way to conditionally render different components or content based on a condition. If the condition is true,expression1is rendered; otherwise,expression2is rendered. For example:
jsxCopy coderender() {
  return (
    <div>
      {isError ? <ErrorMessage /> : <SuccessMessage />}
    </div>
  );
}
- Switch statements: In more complex scenarios with multiple conditions, you can use JavaScript switch statements to determine which component or content to render based on different cases. Each case can correspond to a different component or content. For example:
jsxCopy coderender() {
  switch (status) {
    case 'loading':
      return <LoadingSpinner />;
    case 'success':
      return <SuccessMessage />;
    case 'error':
      return <ErrorMessage />;
    default:
      return null;
  }
}
These are some common approaches to achieve conditional rendering in React. You can choose the one that best suits your use case based on the complexity of the conditions and the desired rendering behavior. Conditional rendering allows you to create dynamic and interactive UIs by selectively rendering components or content based on the current state or props of your application.
what to answer when an interviewer asks what is conditional rendering along with example
ChatGPT
When an interviewer asks about conditional rendering and requests an example, you can respond with the following explanation:
"Conditional rendering in React allows us to display different components or content based on specific conditions or values. It's a powerful feature that enables us to create dynamic and responsive user interfaces. By evaluating conditions, we can choose which components or content to render, enabling us to customize the user experience based on various factors.
Here's an example to illustrate conditional rendering in React:
Suppose we have a simple component called Greeting that displays a welcome message based on whether a user is logged in or not:
import React from 'react';

const Greeting = ({ isLoggedIn }) => {
  if (isLoggedIn) {
    return <h1>Welcome back, User!</h1>;
  } else {
    return <h1>Please log in to continue.</h1>;
  }
};

export default Greeting;
In this example, the Greeting component takes a prop called isLoggedIn that indicates whether the user is logged in or not. We use an if statement to conditionally render a different message depending on the value of isLoggedIn. If the user is logged in, the component displays a welcome message; otherwise, it prompts the user to log in.
To use this Greeting component, we can pass the isLoggedIn prop based on the state or logic of our application, such as:
import React from 'react';
import Greeting from './Greeting';

const App = () => {
  const isLoggedIn = true;

  return (
    <div>
      <h1>My App</h1>
      <Greeting isLoggedIn={isLoggedIn} />
    </div>
  );
};

export default App;
In this example, we set the isLoggedIn variable to true to simulate a logged-in user. The Greeting component will render the "Welcome back, User!" message accordingly.
Conditional rendering allows us to handle different scenarios based on the state of our application, user input, or API responses. By selectively rendering components or content, we can create dynamic and interactive user interfaces that respond to changes in real-time."
useEffect
In React, the useEffect hook is a built-in hook that allows you to perform side effects in functional components. Side effects refer to operations such as data fetching, subscriptions, or manually updating the DOM, which typically need to be performed after the component has rendered or when certain dependencies have changed.
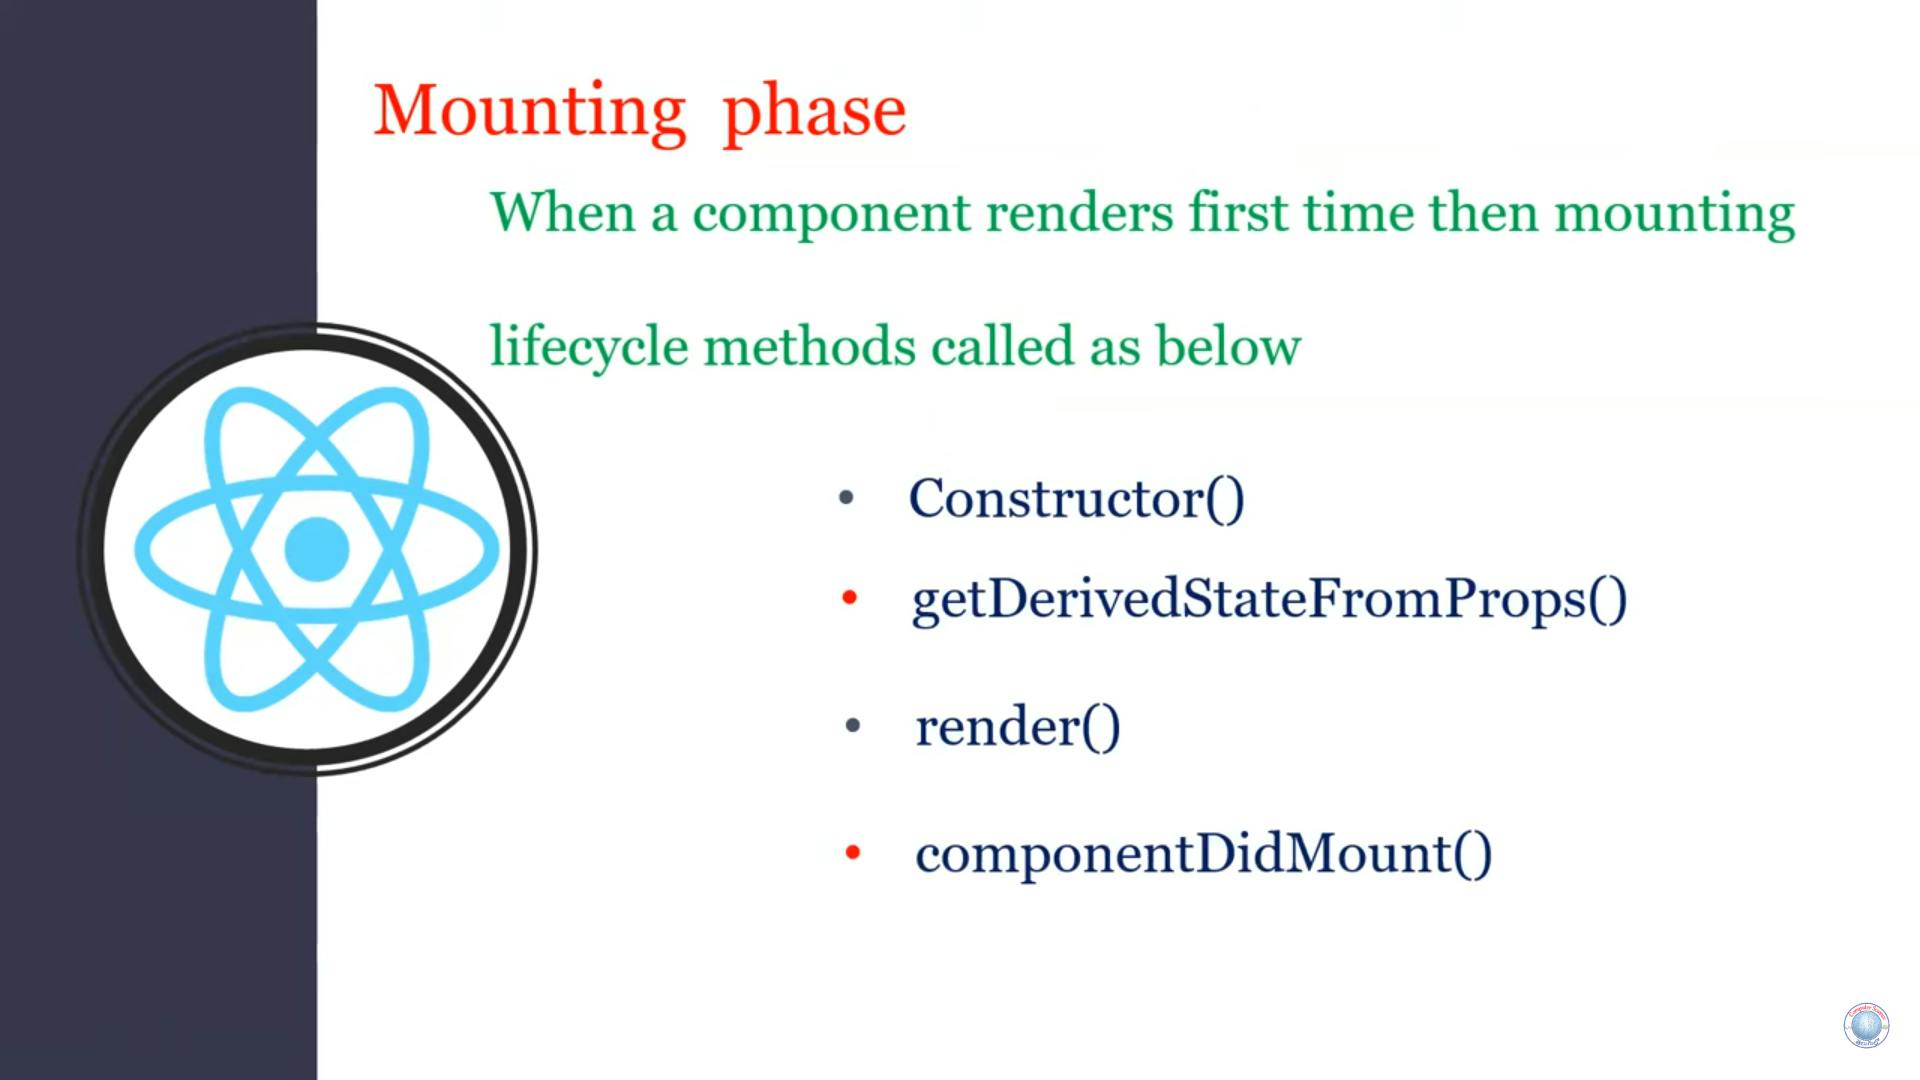
The useEffect hook is similar to the lifecycle methods componentDidMount, componentDidUpdate, and componentWillUnmount in class components, but it combines all three into a single hook. It ensures that the side effects are performed consistently and efficiently, improving code readability and maintainability.
The basic syntax of the useEffect hook is as follows:
useEffect(() => {
  // Side effect code here
  // This code will run after every render
  // You can return a cleanup function if needed
}, [dependencyList]);
The useEffect hook takes two arguments: a callback function that represents the side effect, and an optional dependency array.
The callback function contains the code that should be executed as the side effect. It can perform actions like updating state, making API requests, subscribing to events, or interacting with the browser's APIs. This code will run after the initial render and after every re-render of the component.
The dependency array is an optional second argument. It allows you to specify dependencies that the useEffect hook should watch for changes. If any of the dependencies change between renders, the side effect will be executed again. If the dependency array is empty, the side effect will only run once, after the initial render.
Here's an example to illustrate the usage of useEffect:
import React, { useEffect, useState } from 'react';

const MyComponent = () => {
  const [count, setCount] = useState(0);

  useEffect(() => {
    document.title = `Count: ${count}`;
  }, [count]);

  return (
    <div>
      <h1>Count: {count}</h1>
      <button onClick={() => setCount(count + 1)}>Increment</button>
    </div>
  );
};

export default MyComponent;
In this example, we have a component called MyComponent that displays a count value and updates the document title to reflect the current count value. We use the useEffect hook with a dependency array containing count as the dependency. This ensures that whenever the count state changes, the effect of updating the document title will be triggered.
The useEffect hook allows you to manage side effects easily and ensures that they are executed at the appropriate times during the component lifecycle. It helps keep your code organized and promotes the separation of concerns in functional components.
import './App.css';
import React, { useEffect, useState} from "react";


let B=()=>{

  const [a,b]=useState(0);

  useEffect(()=>{
    console.log("from use effect");
  },[a])

    return(
      <>
      <h1>count:{a}</h1>
     <button onClick={()=>{b(a+1)}} >click</button>
      </>
    );
}


let App=()=>{
  return(
    <>

   <B/>
    </>
  );

}
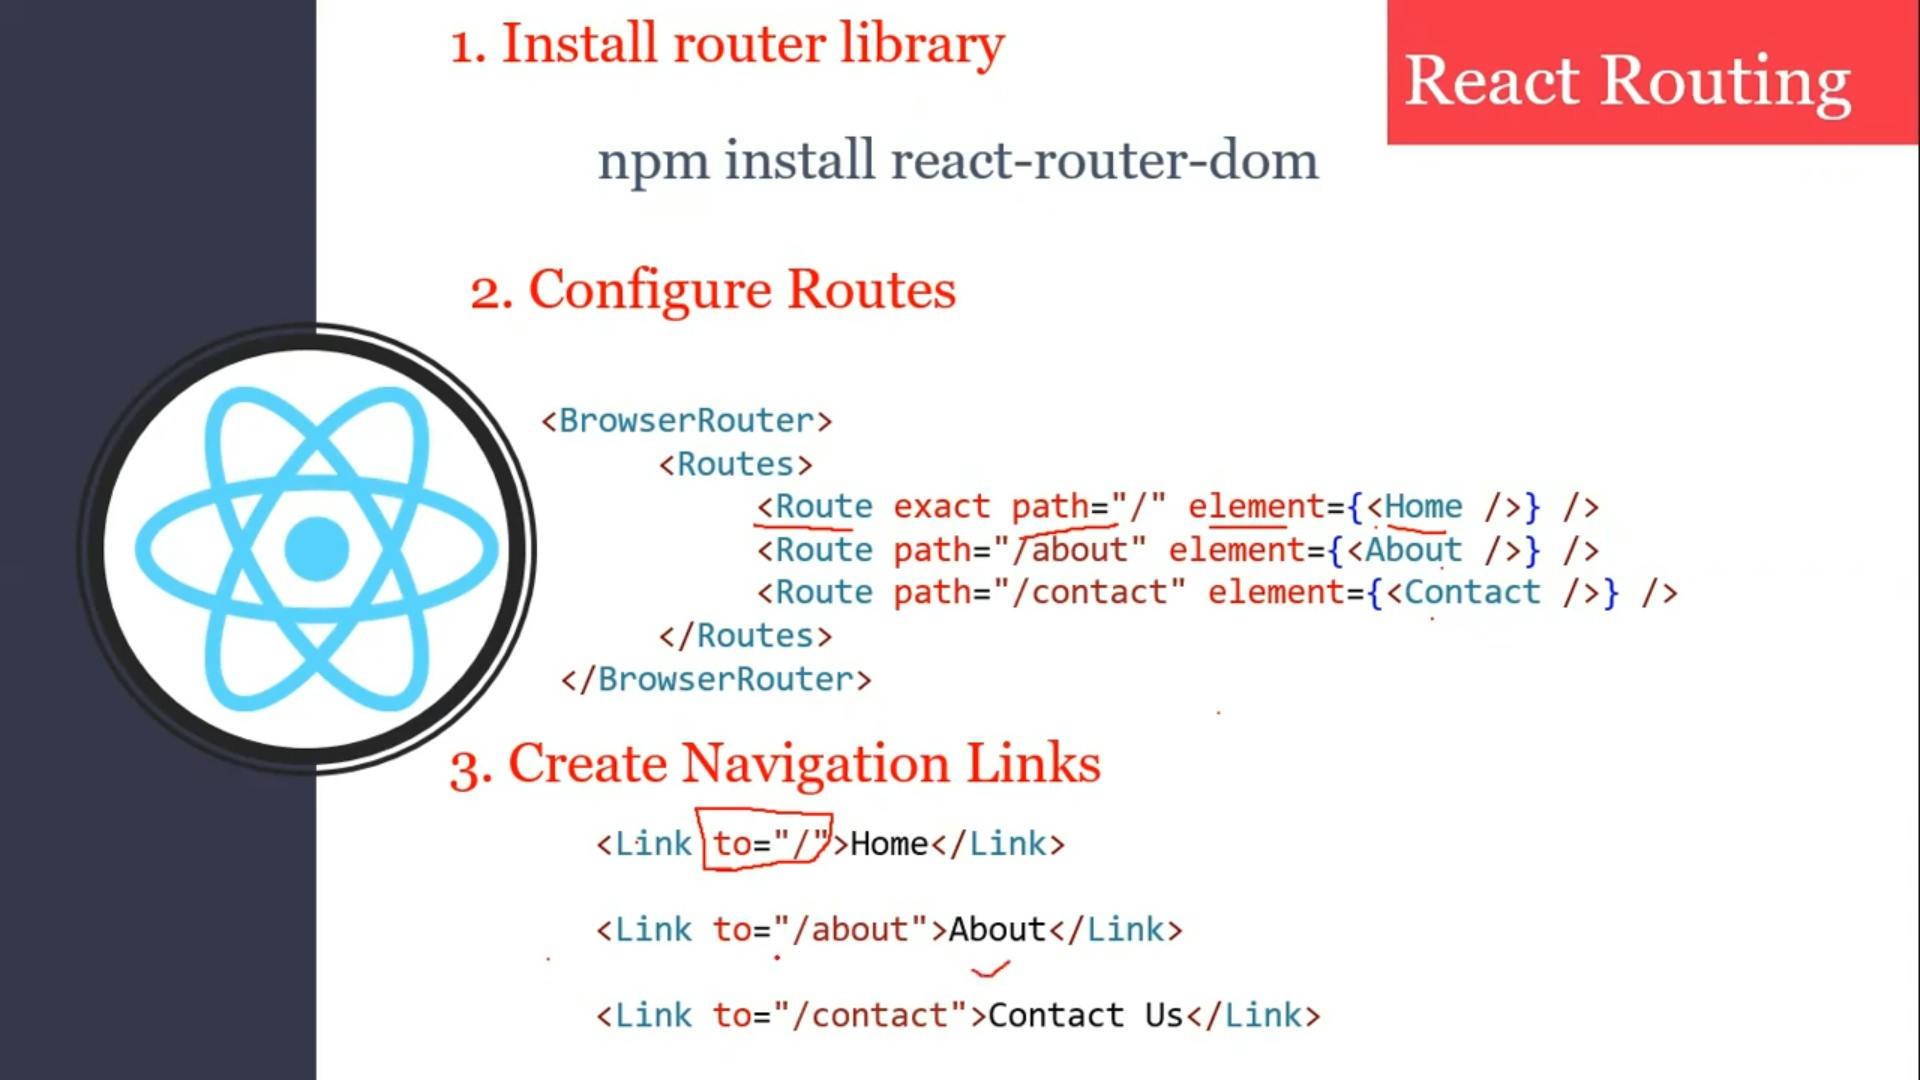
React Router
Routing in React allows you to handle different URLs or paths and render different components based on the current URL. It enables you to create multi-page applications where users can navigate between different views or pages without having to reload the entire application.
https://www.w3schools.com/REACT/react_router.asp
In App.js file
import {BrowserRouter,Routes,Route} from "react-router-dom";
import Layout from "./Layout";
import About from "./about";
import Home from "./Home";
function App(){

return(
  <>

<BrowserRouter>
<Routes>
  <Route path="/" element={< Layout />} />
  <Route path="/about" element={<About/>} />
  <Route path="/home" element={<Home/>} />
</Routes>
</BrowserRouter>
  </>
)

}
export default App;
In Layout.js file
import {Link,Outlet} from "react-router-dom"

export default function Layout(){

    return(
        <>
        <ul>
            <li><Link to="/" >Home</Link></li>
            <li><Link to="/about" >About</Link></li>

        </ul>
        <Outlet/>
        </>
    )
}
In Home.js file
export default function Home(){

    return (
        <>
        <h1>this is home</h1>
        </>
    )
}
sub routing
for subrouting we dont give "/" and define whole compoment in <Route></Route> tag
// App.js
import {BrowserRouter,Routes,Route} from "react-router-dom";
import About,{Hj} from "./about";
import { Link } from "react-router-dom";
let Head=()=>{
  return(
    <>
    <Link to="/about" >about</Link>
    </>
  );
}

function App() {
  return (
    <>
    <BrowserRouter>
    <Head/>
    <Routes>

      <Route path="/about" element={<About/>}  >

     <Route path="users" element={<Hj/>} />

     </Route>
    </Routes>
    </BrowserRouter>
    </>
  );
}

export default App;
//about.js
import { Outlet,Link } from "react-router-dom";

let About=()=>{
    return (<>
    <button><Link to="users" >click to go to users</Link></button>
    <h1>about file </h1>
    <Outlet/>
    </>
    );

}


let Hj=()=>{
    return (
        <>
        <h1>ahdshgshds</h1>>
        </>
    );
}
export default About;

export {Hj};
useRef
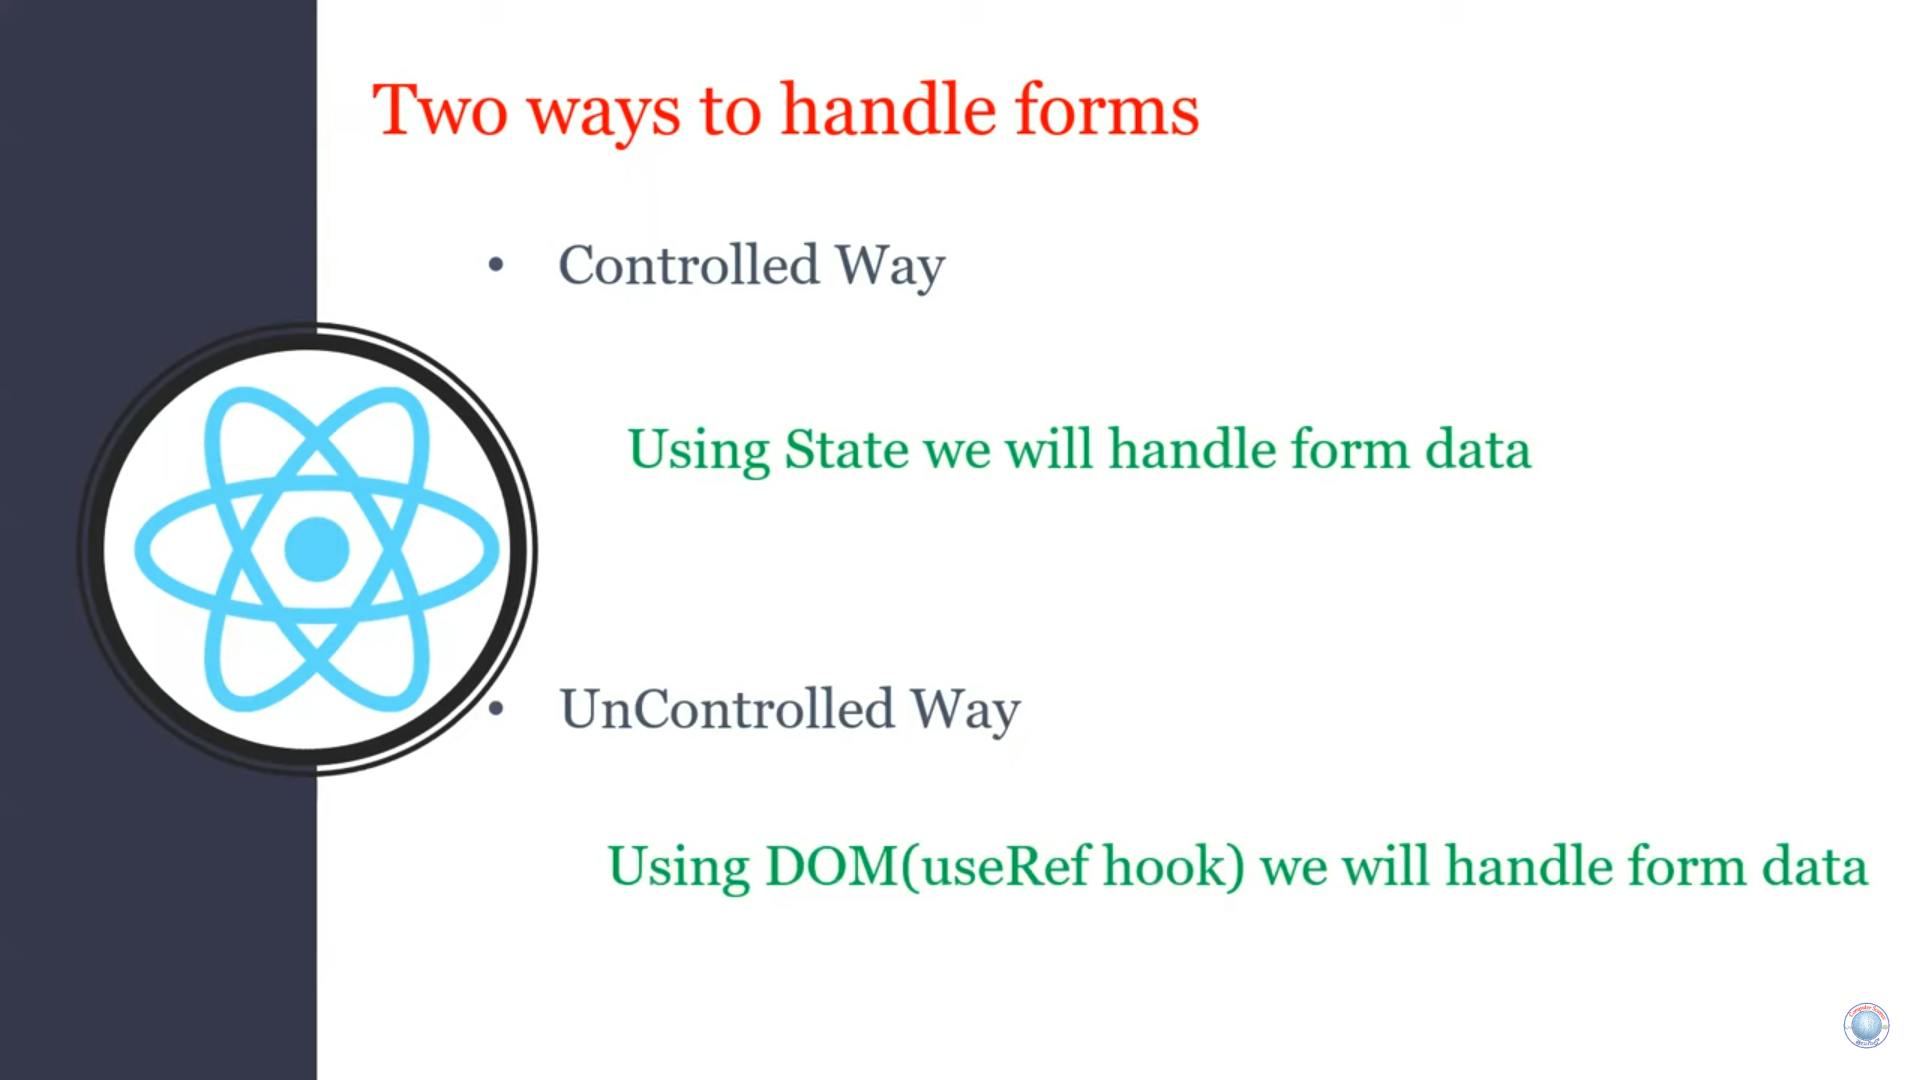
The useRef hook is a built-in hook provided by React that allows you to create a mutable reference to a value or a DOM element. It is primarily used to access and manipulate DOM elements or to persist values across re-renders without triggering a re-render itself.
Here's an explanation of how the useRef hook works in React:
Import the hook: Import the
useRefhook from thereactpackage in your component file.Initialize the ref: Inside your functional component, use the
useRefhook to create a ref variable and assign it to a value or a DOM element. You can do this by callinguseRef()and passing an initial value ornullif you don't have an initial value.import React, { useRef } from 'react'; function MyComponent() { const myRef = useRef(); // ... }Accessing the ref value: You can access the value stored in the ref using the
.currentproperty. Initially, it will be set to the value passed touseRef(). You can also update the value by assigning a new value to.current.function MyComponent() { const myRef = useRef('initial value'); console.log(myRef.current); // Output: 'initial value' myRef.current = 'new value'; console.log(myRef.current); // Output: 'new value' }Refs and DOM elements:
useRefis commonly used to reference and manipulate DOM elements. You can assign the ref to therefattribute of a JSX element, and then access the corresponding DOM element through the.currentproperty.function MyComponent() { const inputRef = useRef(); const handleClick = () => { inputRef.current.focus(); // Focuses the input element }; return ( <div> <input type="text" ref={inputRef} /> <button onClick={handleClick}>Focus Input</button> </div> ); }In the example above, clicking the button will trigger the
handleClickfunction, which uses theinputRefto access and focus the input element.Retaining values across re-renders: Unlike normal variables declared within a functional component, the value stored in a
useRefis preserved across re-renders. This can be useful for storing mutable values that don't trigger re-renders when updated.function MyComponent() { const countRef = useRef(0); const handleClick = () => { countRef.current += 1; // Value is retained across re-renders console.log(countRef.current); }; return <button onClick={handleClick}>Increment</button>; }In the example above,
countRefretains its value across re-renders and can be updated without triggering a re-render.
The useRef hook provides a way to access and manage values or DOM elements in React components without causing re-renders. It's important to note that changing the .current property of a useRef object doesn't trigger a re-render, so it's not suitable for managing application state that requires reactivity. For that purpose, you would typically use the useState or useReducer hooks.
custom hooks
Custom hooks in React are JavaScript functions that enable you to reuse stateful logic across multiple components. They allow you to extract and encapsulate common logic into a custom hook, making it easier to share and manage that logic throughout your application.
Here's how custom hooks work in React:
- Creating a Custom Hook: To create a custom hook, you start by defining a JavaScript function with the
useprefix. By convention, custom hooks are named with the prefixuseto indicate that they follow the rules of React hooks.
function useCustomHook() {
  // Custom hook logic
}
- Stateful Logic and React Hooks: Inside the custom hook, you can use built-in React hooks like
useState,useEffect,useRef, or other custom hooks. This allows you to utilize state and lifecycle functionality in your custom hook.
import { useState, useEffect } from 'react';

function useCustomHook() {
  const [count, setCount] = useState(0);

  useEffect(() => {
    // Perform side effects or subscriptions
    // Cleanup code if needed
    return () => {
      // Cleanup logic
    };
  }, [count]);

  // Return state, functions, or any other data
  return count;
}
- Using the Custom Hook: Once you've created the custom hook, you can use it in your functional components by invoking it as a regular function. Custom hooks can be used inside the body of other custom hooks, or in the top level of a functional component.
function MyComponent() {
  const count = useCustomHook();

  // Use the state or functions returned by the custom hook
  // Render JSX based on the state or invoke functions as needed

  return (
    <div>
      <p>Count: {count}</p>
      <button onClick={() => setCount(count + 1)}>Increment</button>
    </div>
  );
}
- Reusing Logic Across Components: One of the primary benefits of custom hooks is the ability to reuse common logic across multiple components. Multiple components can utilize the same custom hook and share the state and functionality provided by the hook.
function ComponentA() {
  const count = useCustomHook();
  // Use the count state and related functionality
}

function ComponentB() {
  const count = useCustomHook();
  // Use the count state and related functionality
}
By abstracting and encapsulating complex logic or stateful operations into custom hooks, you can create modular and reusable code. Custom hooks promote code reuse, simplify component logic, and make it easier to manage shared stateful behavior across your React application.
https://github.com/racharlasrikanth/react-full-course/tree/srikanth/src/8-customHooks/final
props drilling
Prop drilling is a term used in React to describe a situation where props need to be passed through multiple layers of nested components in order to reach a deeply nested component that requires the data. It occurs when intermediate components do not need the prop themselves but are responsible for passing it down to their child components.
Here's an example to illustrate prop drilling:
javascriptCopy code// Parent component
function ParentComponent() {
  const name = 'John';

  return (
    <div>
      <ChildComponent name={name} />
    </div>
  );
}

// Child component
function ChildComponent({ name }) {
  return <GrandchildComponent name={name} />;
}

// Grandchild component
function GrandchildComponent({ name }) {
  return <p>Hello, {name}!</p>;
}
In this example, the ParentComponent has a name prop, and it renders the ChildComponent, passing the name prop to it. The ChildComponent does not use the name prop itself, but it forwards it to the GrandchildComponent by passing it as a prop.
This pattern continues if there are more intermediate components involved. Each intermediate component acts as a middleman for passing down the prop until it reaches the desired component that actually needs the prop value.
While prop drilling can work, it has some drawbacks:
Code Maintainability: As the number of components grows, prop drilling can make the code harder to maintain and understand since you need to trace the flow of props through multiple layers.
Component Coupling: Prop drilling tightly couples components together because the intermediate components need to be aware of and pass down the props, even if they don't use them. This reduces component encapsulation and makes refactoring more challenging.
To mitigate these issues, there are alternative approaches you can consider to avoid excessive prop drilling:
Context API: React's Context API allows you to create a context that holds a value and make it accessible to any component within a specific scope. Components can access the context value directly without needing to pass it through props explicitly.
State Management Libraries: State management libraries like Redux or MobX provide centralized stores where data can be stored and accessed from any component without the need for prop drilling.
Custom Hooks: Custom hooks can be used to encapsulate and share stateful logic across components, allowing you to avoid prop drilling by extracting the common logic into a reusable hook.
By using these alternatives, you can effectively avoid prop drilling and make your code more maintainable, scalable, and easier to refactor in larger React applications.
useContext
The Context API is a feature in React that allows you to manage global state and share data between components without passing props through every level of the component tree. It provides a way to pass data down the component hierarchy without explicitly passing it through each intermediate component.
Introduced in React version 16.3, the Context API simplifies state management and avoids the need for prop drilling in certain scenarios. The Context API consists of two main parts: the Context object and the Context Provider.
Here's an explanation of the Context API and the Context Hook (useContext) in React:
- Creating a Context: First, you need to create a context using the
createContextfunction from thereactmodule. This function returns a Context object that holds the current state and a method to update it.
import React from 'react';

const MyContext = React.createContext();
- Providing a Context Value: To make the context value available to the components, you need to wrap them in a Context Provider. The Provider component accepts a
valueprop that specifies the data you want to share.
function App() {
  const contextValue = 'Hello, World!';

  return (
    <MyContext.Provider value={contextValue}>
      <ChildComponent />
    </MyContext.Provider>
  );
}
In this example, the MyContext.Provider component is used to provide the context value ('Hello, World!') to the ChildComponent and its nested components.
- Accessing the Context Value: To access the context value within a component, you can use the Context Hook called
useContext. This hook allows you to retrieve the current context value and use it in your component.
import React, { useContext } from 'react';

function ChildComponent() {
  const contextValue = useContext(MyContext);

  return <p>{contextValue}</p>;
}
In this example, the useContext hook is used in the ChildComponent to access the value provided by the MyContext.Provider. The contextValue variable now holds the value 'Hello, World!', which can be rendered in the component.
By using the Context API and the useContext hook, you can share data across components without explicitly passing it through props. This is particularly useful when dealing with global or shared state, such as user authentication status, theme preferences, or language settings.
Note that multiple components can access the same context value, and when the context value changes, all components consuming that value will re-render to reflect the updated state.
It's important to note that the Context API is best suited for managing global or shared state that affects a large portion of your application. For smaller-scale state management within a component or a few closely related components, the useState hook may be more appropriate.
import {createContext} from "react";
import Testdata from "./testdata";

export  let Abc= createContext();
function App(){

  let name="shajahan";

  return(
    <>
    <Abc.Provider value={name} > <Testdata/></Abc.Provider>


    </>
  )

}
export default App;
import {useContext} from "react";
import { Abc } from "./App";

export default function Testdata(){


    let h=useContext(Abc);
    return(
        <>
        <h1>my name is {h}</h1>
        </>
    )
}
useMemo
The useMemo hook in React is used to optimize the performance of functional components by memoizing the results of expensive computations. It allows you to memoize the return value of a function and only recompute it when the dependencies have changed. This can help reduce unnecessary calculations and improve the overall efficiency of your React application.
Here's an explanation of how useMemo works:
Memoization: Memoization is a technique where the result of a function is cached based on its inputs. If the inputs (dependencies) remain the same, the cached result is returned instead of recomputing the function. This can be beneficial when you have computationally expensive operations that produce the same result for the same inputs.
Syntax: The
useMemohook takes two arguments: a function and an array of dependencies. The function represents the expensive computation or logic that you want to memoize, and the dependencies are the values that the function depends on. The hook returns the memoized result of the function.
const memoizedValue = useMemo(() => {
  // Expensive computation or logic
  return someValue;
}, [dependency1, dependency2]);
In this example, the function provided to useMemo will only be re-executed if any of the dependencies (dependency1 or dependency2) have changed. If the dependencies remain the same, the cached value (memoizedValue) will be returned.
Use Cases: The
useMemohook is useful in scenarios where you have expensive calculations, complex data transformations, or heavy operations that can be avoided by caching the result. Some common use cases include:Computing derived data from props or state.
Avoiding re-rendering expensive components.
Optimizing performance when dealing with large datasets.
By memoizing the result of a function with useMemo, you can prevent unnecessary recomputations and improve the performance of your React components.
It's important to note that useMemo is not always necessary. You should only use it when you have identified a specific computation that is causing performance issues or when the cost of the computation is high enough to warrant optimization. Premature optimization without proper profiling and testing may lead to unnecessary complexity in your code.
Additionally, remember that useMemo is not intended to handle side effects. If you need to perform side effects (e.g., data fetching, subscriptions), you should use the useEffect hook instead.
Overall, useMemo is a powerful tool in React for optimizing performance by memoizing expensive computations. It can help you strike a balance between performance and reactivity in your application.
without usememo
import React, { useState } from "react";

function App() {
  let [a, b] = useState(0);
  let Gh=(aa)=>{
    let sum=0;
    for (let i=0;i<=aa;i++){
      sum+=i;

    }
    return sum;
  }

let abc=Gh(203434300);
  return (
    <div>
      <h1>{a}</h1>
      <button
        onClick={() => {
          b(a + 1);
        }}
      >
        click
      </button>

      <h2>{abc}</h2>

    </div>
  );
}


export default App;
with usememo
useCallback
The useCallback hook in React is used to optimize the performance of components that rely on functions or callbacks. It returns a memoized version of the callback function, which means that the returned function will only change if any of its dependencies change. This can prevent unnecessary re-renders and optimize the overall performance of your application.
The syntax for useCallback is as follows:
const memoizedCallback = useCallback(callback, dependencies);
Here's how it works:
The
callbackparameter is the function that you want to memoize. It can be an inline function or a function defined elsewhere.The
dependenciesparameter is an array of values that the callback function depends on. When any of these dependencies change, the callback function will be re-created. If the dependencies remain the same, the previously memoized version of the callback is returned.
By memoizing the callback function, you can ensure that it remains the same across re-renders as long as its dependencies don't change. This is useful in scenarios where the callback is passed down to child components as a prop or used in useEffect or useMemo hooks.
Here's an example to illustrate the usage of useCallback:
import React, { useState, useCallback } from 'react';

function Counter() {
  const [count, setCount] = useState(0);

  const increment = useCallback(() => {
    setCount(prevCount => prevCount + 1);
  }, []);

  return (
    <div>
      <p>Count: {count}</p>
      <button onClick={increment}>Increment</button>
    </div>
  );
}
In this example, the increment function is wrapped with useCallback. Since it doesn't depend on any values, an empty dependency array ([]) is provided. This means that the increment function will only be created once when the Counter component is initially rendered, and it won't change on subsequent re-renders.
By using useCallback, we avoid creating a new instance of the increment function on every re-render, which could potentially cause unnecessary re-renders in child components that receive the increment function as a prop. Instead, we ensure that the same function reference is preserved across re-renders as long as the dependencies don't change.
Note that while useCallback can be helpful for performance optimization, it should be used judiciously. Only memoize functions that are truly expensive to create or are dependencies in other hooks. Overusing useCallback can lead to unnecessary complexity and reduce the benefits of React's efficient rendering mechanism.
give an example of usecallback
ChatGPT
Certainly! Here's an example that demonstrates the usage of useCallback:
jsxCopy codeimport React, { useState, useCallback } from 'react';

function ParentComponent() {
  const [count, setCount] = useState(0);

  const increment = useCallback(() => {
    setCount(count + 1);
  }, [count]);

  return (
    <div>
      <p>Count: {count}</p>
      <ChildComponent increment={increment} />
    </div>
  );
}

function ChildComponent({ increment }) {
  console.log('ChildComponent rendered');

  return (
    <div>
      <button onClick={increment}>Increment</button>
    </div>
  );
}
In this example, we have a ParentComponent that renders a ChildComponent. The ParentComponent maintains a count state variable and defines an increment function using useCallback. The increment function increments the count value when called.
The increment function has a dependency on the count variable, so we include it in the dependency array [count] when calling useCallback. This ensures that the increment function is re-created whenever the count value changes.
The increment function is passed down to the ChildComponent as a prop. The ChildComponent renders a button, and when clicked, it invokes the increment function.
By using useCallback, we memoize the increment function so that it remains the same between re-renders of the ParentComponent, as long as the count value doesn't change. This prevents unnecessary re-renders of the ChildComponent when the ParentComponent updates.
In the console, you can observe that the message "ChildComponent rendered" is only logged when the ParentComponent initially renders and not on subsequent re-renders triggered by state changes. This confirms that the ChildComponent doesn't re-render when the count value changes, thanks to the memoized increment function.
Using useCallback in this manner helps optimize performance by avoiding unnecessary re-renders of child components that depend on functions passed as props. It ensures that the functions are only recreated when their dependencies change, reducing the overall computational cost of rendering.